
Main Courses
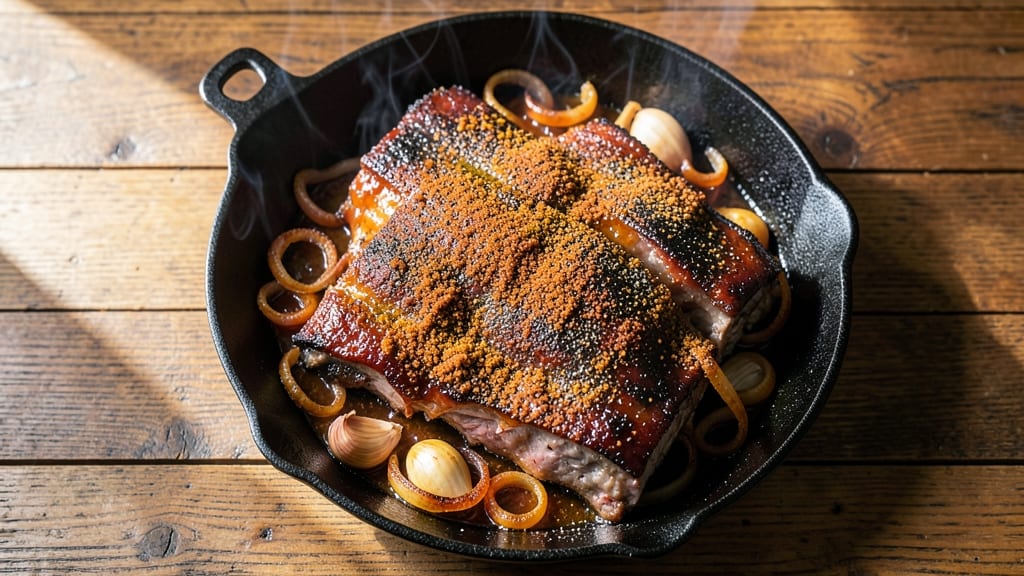
Mastering baked back ribs transforms tough cuts into melt-in-your-mouth perfection without a smoker. This method delivers restaurant-quality tenderness in just 3 hours, using simple techniques that guarantee fall-off-the-bone results every time. The secret lies in precise seasoning and slow baking, which breaks down collagen while preserving moisture.
Unlike traditional smoked ribs, this approach uses your oven to create deep, smoky flavors with minimal effort. A dry rub of brown sugar, paprika, and garlic builds a flavorful crust, while baking at 275°F ensures even cooking without drying out the meat.
No special equipment needed—just patience and attention to detail.
By the end, you’ll have ribs so tender they pull apart with a fork, with crisp edges that add satisfying texture. The aroma alone will have everyone gathering at the table, and the rich, caramelized surface makes every bite worth the wait.
This recipe proves great ribs don’t require a smoker or hours of babysitting.
Perfect for game day, family dinners, or when you crave a hands-off meal that still feels special. Pair with classic sides like coleslaw or cornbread for a complete spread. Let’s get started on ribs that’ll impress even the most skeptical meat lovers.
Ingredients for baked back ribs
Four pounds of ribs and a handful of pantry staples—this is your shortcut to smoky, fall-off-the-bone perfection.
| Ingredient | Amount | Notes |
|---|---|---|
| Back Ribs 🥩 | 4 lb | Bone-in, meaty cuts preferred |
| Light Brown Sugar 🍚 | ½ cup | Packed, for caramelization |
| Smoked Paprika 🌶️ | 2 tbsp | For deep smoky flavor |
| Garlic Powder 🧄 | 1 tbsp | Freshly ground preferred |
| Onion Powder 🧅 | 1 tbsp | For balanced seasoning |
| Ground Black Pepper 🌶️ | 1 tbsp | Freshly cracked for intensity |
| Kosher Salt 🧂 | 1 ½ tbsp | Diamond Crystal preferred |
| Apple Cider Vinegar 🍎 | ¼ cup | For tenderizing and tang |
| Yellow Onion 🧅 | 1 whole | Sliced, for aromatics |
| Fresh Garlic 🧄 | 6 cloves | Minced, for bold flavor |
| Butter 🧈 | ½ cup | Unsalted, for basting |
| Beef Broth 🍲 | 1 cup | Low-sodium preferred |
| Honey 🍯 | 2 tbsp | For extra gloss and sweetness |
| Fresh Rosemary 🌿 | ¼ cup | Chopped, for herbal depth |
The ribs are the star, so look for bone-in, meaty cuts—they’ll yield the best flavor and texture. Costco or your local butcher shop are great places to find them fresh. If you’re buying frozen, thaw overnight in the fridge for even cooking. The brown sugar is key here—it caramelizes beautifully during baking, giving those crisp edges. Use light brown sugar for a perfect balance of sweetness and depth. For the smoked paprika, Penzeys or bulk bins at natural markets have the best quality, but any good brand will work. Freshly ground garlic powder and onion powder make a noticeable difference, so if you’ve got whole spices, grind them yourself.
No smoked paprika? Substitute with a mix of chili powder and a pinch of liquid smoke—it’s not identical, but it’ll get you close. Running short on apple cider vinegar? White vinegar or lemon juice work in a pinch, though the flavor profile will shift slightly. The beef broth can be swapped for water, but adding a splash of Worcestershire sauce will help replicate that umami depth. For the butter, unsalted is a must—you’re already controlling the salt with Diamond Crystal kosher salt. If you can’t find fresh rosemary, dried works at one-third the amount, but it won’t have the same aromatic punch.
Prep the ribs the night before if you can—let them sit in the fridge uncovered for 24 hours to dry-brine. This step is non-negotiable for crispy edges. The dry rub will keep in an airtight container for up to 2 weeks, so make extra if you’re hosting. Once baked, ribs reheat beautifully—wrap them in foil with a splash of beef broth and bake at 300°F for 20 minutes. Store leftovers in the fridge for 4-5 days or freeze for up to 3 months. Portion them into individual wraps for easy reheating later.
Why You'll Love This Recipe
- One-Pan Magic: Honestly, I love when a recipe only needs one pan—no fussing with multiple dishes. Just toss those ribs with brown sugar, smoked paprika, and a sprinkle of garlic powder, then bake until sticky and caramelized. The cleanup? Barely there.
- Sweet-Smoky Crave: That light brown sugar crust? It’s dangerously addictive—crispy on the outside, tender inside, with a deep smoky warmth from the paprika. My kids now ask for seconds before I even finish serving.
- Tailgate or Tuesday: Between us, this recipe works everywhere. Grilling with friends? Throw these on the rack. Weeknight dinner? Same thing. The flavors hold up whether it’s a casual get-together or a lazy Sunday.
- Budget-Friendly Feast: Back ribs are cheaper than you’d think, and a single rack feeds four—or five, if you’re generous. Plus, leftovers reheat like a dream, so you’re really getting two meals for the price of one. Smart, right?
Step-by-step instructions for baked back ribs with smoky tenderness
Master this oven-baked method for ribs that pull apart effortlessly while keeping all their juices locked in.
Prepare the Ribs with Dry Rub and Vinegar Marinade
Pat the 4 lb back ribs completely dry with paper towels—this is crucial for that crisp bark later. In a small bowl, whisk together the 0.5 cup packed light brown sugar, 2 tbsp smoked paprika, 1 tbsp garlic powder, 1 tbsp onion powder, 1 tbsp ground black pepper, and 1.5 tbsp kosher salt until evenly distributed. Generously coat both sides of the ribs with this rub, pressing it into the meat so it adheres.
In a separate bowl, combine the 0.25 cup apple cider vinegar with the 6 cloves minced fresh garlic and 0.25 cup chopped fresh rosemary. Brush this marinade all over the rubbed ribs, letting it sit at room temperature for 30 minutes while you prepare the oven. The vinegar helps tenderize the meat while the rosemary adds herbal depth that pairs perfectly with the smoky flavors.
Build the Baking Pan with Aromatics and Butter
Preheat your oven to 300°F. Line a large baking dish with heavy-duty aluminum foil, leaving enough overhang to seal later. Arrange the 1 whole yellow onion slices at the bottom of the pan, then place the seasoned ribs meat-side up. This creates a flavorful base that will infuse into the meat as it cooks.
In a small saucepan, melt the 0.5 cup unsalted butter over medium heat. Once melted, whisk in the 1 cup low-sodium beef broth and 2 tbsp honey, bringing to a gentle simmer. Pour this mixture evenly over the ribs, coating them completely. The butter bastes the meat while the honey adds a subtle sweetness that caramelizes beautifully during baking.
Seal and Bake for Fall-Off-Bone Tenderness
Carefully fold the foil overhang up to completely seal the ribs in the pan, creating a steam chamber. This technique locks in moisture while allowing the ribs to cook slowly and evenly. Bake at 300°F for 2 hours, then increase the temperature to 325°F and continue baking for another 1 hour. You'll know they're ready when the internal temperature reaches 195°F at the bone—this is the magic number for tender, pull-apart perfection.
About 15 minutes before the ribs finish baking, remove them from the oven and increase the heat to 425°F. Return the ribs to the oven for the final 10 minutes to crisp the bark. This high-heat finish creates that desirable contrast between tender meat and crispy exterior that makes these ribs so satisfying. Keep the foil off during this final stage to develop that beautiful crust.
Rest and Serve with Pan Sauce
Transfer the ribs to a cutting board and tent loosely with foil. Let them rest for at least 15 minutes before serving—this crucial step allows the juices to redistribute throughout the meat. While they rest, carefully pour the pan juices through a fine-mesh strainer into a saucepan and simmer over medium heat until reduced by half. This creates a rich, flavorful sauce that complements the ribs perfectly.
Slice the ribs between the bones and serve with the reduced pan sauce spooned over the top. The combination of tender meat, crispy edges, and aromatic sauce makes each bite unforgettable. These ribs deliver that coveted fall-off-the-bone tenderness while keeping all their natural juices intact, making them perfect for your next gathering or family meal.
Pro Tips For Making Baked Back Ribs
- CRANK THE OVEN HIGH: Start your ribs at 425°F (220°C) for the first 30 minutes—this isn’t just about speed, it’s about rendering fat and locking in flavor. After that, drop to 275°F (135°C) and let them slow bake, but that initial blast makes all the difference in crisping the edges and caramelizing the brown sugar.
- SALT THE RIBS FIRST: Generously coat the ribs with kosher salt (about 1 tsp per pound) and let them sit uncovered in the fridge for at least 4 hours—or overnight if you can. I used to skip this, and the ribs always tasted flat compared to when I do. The salt breaks down the proteins, so the spices stick better and the meat stays juicy.
- SKIP THE CROWDED PAN: If your baking sheet isn’t big enough, don’t stack the ribs—it’ll steam them instead of crisping. Use a half-sheet pan or even a rimmed baking sheet, and give them space. I learned this after my first batch came out soggy, and now I swear by it. Fat needs room to render, and ribs need airflow to get that perfect bark.
- BRUSH ON MOISTURE: Every 45 minutes, drizzle the ribs with a mix of apple cider vinegar and water (1:1 ratio) while they bake. This keeps the brown sugar from burning and adds a subtle tang that cuts through the sweetness. I was skeptical until I tried it—now it’s non-negotiable for me.
Essential equipment for this dish
Oven Essentials
Your oven is the star of this recipe, so make sure it’s calibrated accurately. I recommend using an oven thermometer like the Thermoworks Oven Thermometer—it’s my go-to for ensuring consistent 300°F and 325°F temperatures.
Preheat for at least 30 minutes before baking to guarantee even cooking. For best results, use the middle rack where heat circulates evenly. 🌡️
Baking Dish
A heavy-duty 9x13-inch baking dish or 17x12-inch roasting pan works perfectly for this recipe. I prefer stainless steel or dark enameled pans—they distribute heat more evenly than glass. Avoid aluminum if you’re using high heat for crisping, as it can warp.
Line the pan with heavy-duty aluminum foil for easy cleanup and to create a steam chamber during baking.
Foil and Tools
Heavy-duty aluminum foil is a game-changer here—it’s what creates that steam chamber that keeps the ribs moist. I use Reynolds Heavy Duty Foil because it’s sturdy enough to handle the weight of the ribs and liquids.
Grab a pair of kitchen shears for cutting it cleanly and a meat thermometer like the Thermoworks Smoke to monitor internal temperature accurately.
Mixing and Measuring
For the dry rub, a medium mixing bowl and a whisk work best to evenly distribute the spices. I like using a scale for precise measurements of brown sugar and salt—this ensures consistent flavor every time.
A microplane is handy for fresh garlic and rosemary if you’re using them, but a sharp knife works just fine. 🧂
Pan Sauce Tools
After baking, you’ll need a fine-mesh strainer to remove any solids from the pan sauce, and a small saucepan to reduce it. I use a wire mesh strainer with a pour spout for easy transfer.
A wooden spoon helps stir the sauce gently without scratching the pan. For serving, a ladle with a long handle makes it easy to spoon sauce over the ribs without burning yourself.
Nutrition facts
Frequently asked questions
Why do I need to dry the ribs before seasoning?
Drying the ribs thoroughly creates that perfect crispy bark during baking. Moisture on the surface prevents the seasoning from sticking properly and can lead to steamed ribs instead of caramelized edges. Pat them completely dry with paper towels before applying the rub.
Can I use a slow cooker instead of the oven?
Yes, but with adjustments! Place the ribs in the slow cooker on low for 6-8 hours with the same seasoning and aromatics. Skip the high-heat finish—just add a splash of apple cider vinegar at the end for brightness. The texture will be more tender than crispy, though.
What if my oven doesn't get hot enough for the final crisp?
Broil the ribs for 3-5 minutes under the broiler on high, watching closely to avoid burning. Keep them 3-4 inches from the heat source and use a heat-resistant spatula to flip if needed. For even crispiness, rotate the pan halfway.
How do I store leftovers without drying them out?
Wrap ribs tightly in plastic wrap, then place in an airtight container. Reheat wrapped in foil at 300°F for 20 minutes with a splash of beef broth. For longer storage, freeze portions in individual wraps for up to 3 months—thaw overnight in the fridge.
What sides pair best with these ribs?
Classic choices include creamy coleslaw, cornbread, or roasted sweet potatoes. For a lighter option, serve with a tangy apple slaw or grilled vegetables. The smoky-sweet ribs balance well with cool, crunchy textures and hearty carbs.