
Breakfast & Brunch
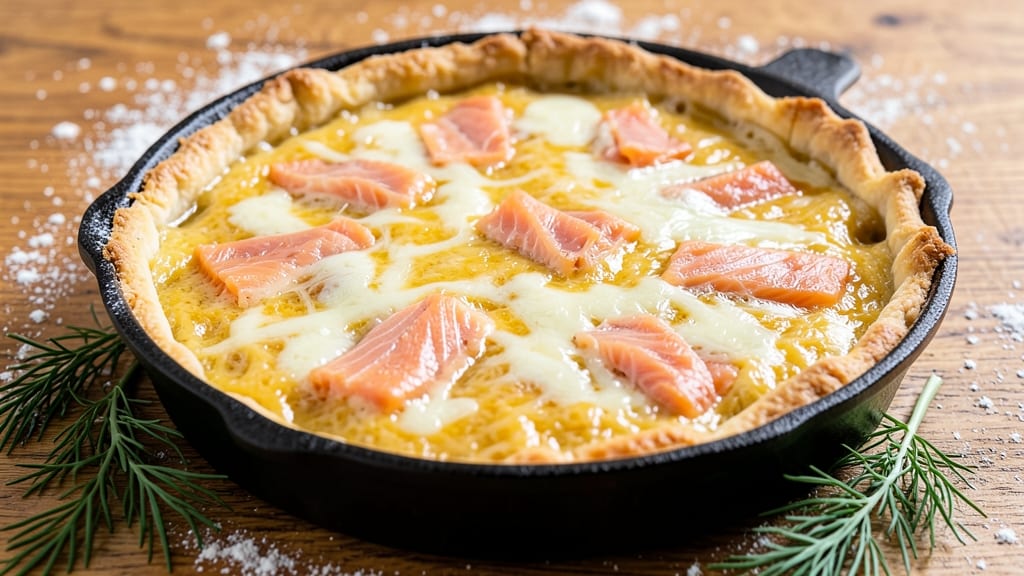
This easy salmon quiche recipe delivers crispy crust, fluffy eggs, and tender salmon in just 30 minutes—no fancy techniques required. I developed it during a busy week when I needed a restaurant-quality brunch dish without the stress.
The secret lies in a simple egg custard that bakes up silky smooth while the crust stays perfectly golden.
You'll start with a store-bought crust (or homemade if you're ambitious) that gets pre-baked just enough to hold its shape without turning soggy. The filling combines flaked salmon, a rich dairy base, and fresh herbs that infuse flavor without overpowering the delicate egg mixture.
This isn't your grandmother's quiche—it's a modern twist that still respects traditional methods.
What you end up with is a crispy-edged, fluffy-centered quiche that slices cleanly and tastes even better the next day. The salmon adds protein and omega-3s while keeping the dish light enough for breakfast or brunch.
Serve with a simple salad or crusty bread for a complete meal that feels special without the effort.
For extra flair, try adding smoked salmon or spinach to the filling—both work beautifully without complicating the process. The recipe scales easily too, so you can make one for two or feed a crowd. Let's get started on this foolproof brunch winner.
Ingredients for easy salmon quiche
Store-bought crust, flaky salmon, and fresh herbs—this quiche comes together faster than you'd think.
| Ingredient | Amount | Notes |
|---|---|---|
| Store-Bought Pie Crust 🥧 | 1 whole | Pre-made or homemade, chilled |
| Large Eggs 🥚 | 4 whole | Room temperature for smooth custard |
| Heavy Whipping Cream 🥛 | ½ cup | Full-fat for richness |
| Whole Milk 🥛 | ½ cup | Warmed slightly for better blending |
| Shredded Cheddar Cheese 🧀 | ¾ cup | Sharp cheddar preferred |
| Cooked Salmon Fillet 🐟 | 1 lb | Flaked, skin removed |
| Fresh Dill 🌿 | ¼ cup | Chopped, stems removed |
| Fresh Chives 🌿 | 0.15 cup | Chopped, mild flavor |
| Salt 🧂 | ½ tsp | Kosher or sea salt |
| Black Pepper 🌶️ | ¼ tsp | Freshly ground preferred |
| Garlic Powder 🧄 | ½ tsp | Freshly ground preferred |
| Unsalted Butter 🧈 | 2 tbsp | Melted for brushing crust |
| All-Purpose Flour 🌾 | 1 tbsp | For egg mixture stability |
The crust is your foundation, so don't skimp. Pepperidge Farm or Pillsbury work great for convenience, but homemade crusts hold up better if you're ambitious. Look for a crust with visible flaky layers—those frozen ones with the little dots are perfect. If you're using homemade, chill it for at least 30 minutes before baking to prevent shrinking. The salmon should be fully cooked and flaked—canned salmon works in a pinch, but fresh is worth the extra effort. I usually grab wild-caught from the seafood counter, but pre-cooked fillets from the grocery store freezer section save time.
No dill? Fresh parsley or chives work just as well—they're milder but still add brightness. Short on cream? Half-and-half plus a splash of milk keeps it rich without breaking the bank. The cheese matters here—sharp cheddar melts perfectly, but Gruyère or Swiss add depth if you're feeling fancy. For the eggs, room temperature is key—they blend smoother and the custard turns out fluffier. No need to stress about exact measurements with the herbs, but measure the salt precisely—too much will overpower the delicate flavors.
This quiche reheats beautifully—just 10 minutes at 350°F until warmed through. Store leftovers in an airtight container for up to 4 days in the fridge, or freeze portions for 2 months. I like to slice it ahead of time and reheat individual portions for quick breakfasts. The crust stays crispy if you cover it loosely with foil when reheating. For extra flair, sprinkle a little extra cheese on top before baking—it gets golden and bubbly.
Why You'll Love This Recipe
- No-Fuss Assembly: I swear by this one—just unfold the crust, dump in the pre-cooked salmon (or even canned, drained), sprinkle cheese, then pour the egg-cream mix. No rolling, no fussing, no stress. The crust holds together like it’s been there forever, even if my hands are still sticky from the kids’ art project.
- Creamy Cheese Pull: That moment when you cut into it and the cheese stretches just enough to make the whole kitchen smell amazing? The heavy cream and milk create this silky custard, while the cheddar adds that sharp, melty bite. Honestly, the first bite makes me want to skip dinner and just eat it straight from the pan.
- Weeknight to Brunch: I make this for lazy Sunday mornings, but it’s also my secret weapon when friends drop by unannounced. Serve it warm with a side salad for dinner, or let it cool and slice it for brunch the next day. The crust stays crispy either way—no sad, soggy bottoms here.
- Leftovers That Don’t Suck: Most quiches turn into rubber the second day, but not this one. The cream keeps it rich, not dry, and the cheese stays gooey. I’ll pack slices for lunches all week, or reheat them in the oven until the edges are golden again. Between us, I’ve eaten this cold straight from the fridge, and it’s still ridiculously good.
Step-by-step instructions for easy salmon quiche
Here's how to assemble this simple yet impressive quiche with minimal effort.
Preheat and Prepare the Crust
Preheat your oven to 375°F. Remove the store-bought pie crust from the refrigerator and place it on a baking sheet. I like to use a 9-inch pie dish for this recipe—it gives you that perfect single-serving portion size. Prick the crust all over with a fork using a light hand to prevent puffing during baking.
Brush the bottom and sides of the crust generously with the 2 tablespoons melted unsalted butter. This creates that golden, crispy crust you're after. Sprinkle the bottom with about ¼ teaspoon of the salt to enhance flavor. Place the crust in the oven and bake for 8-10 minutes until it's just starting to turn golden around the edges. Don't overbake it—you want it firm but not fully cooked yet.
Prepare the Salmon Filling
While the crust bakes, flake the 1 pound cooked salmon fillet into small, even pieces using two forks. In a medium bowl, combine the salmon with the 0.25 cup chopped fresh dill, 0.15 cup chopped fresh chives, 0.75 cup shredded cheddar cheese, 0.5 teaspoon garlic powder, and the remaining 0.25 teaspoon black pepper. Mix gently but thoroughly to distribute all the seasonings evenly.
This is where the flavor really comes together. The dill and chives add freshness, while the cheddar and garlic powder create a savory base. Don't skip this step—proper seasoning makes all the difference in the final dish. The mixture should look moist but not wet, with the salmon pieces evenly coated in herbs and cheese.
Make the Egg Mixture
In a separate large bowl, whisk together the 4 large eggs, 0.5 cup heavy whipping cream, and 0.5 cup whole milk until well combined. Add the 1 tablespoon all-purpose flour and whisk again until smooth. This flour helps stabilize the custard and gives it a slightly thicker texture, which is especially important for a quiche with a high moisture content from the salmon.
Season the egg mixture with the remaining 0.25 teaspoon salt if needed—taste it to make sure it's well-seasoned. The mixture should be pale yellow and completely smooth. I've found that room temperature eggs blend better, so if they're straight from the fridge, let them sit at room temperature for about 10 minutes before using. This makes for a smoother, fluffier custard.
Assemble and Bake the Quiche
Remove the partially baked crust from the oven and let it cool for about 2 minutes. Spread the salmon mixture evenly over the bottom of the crust, creating a single layer. Then, carefully pour the egg mixture over the salmon, letting it flow evenly to the edges. Tap the baking sheet gently on the counter to help any air bubbles rise to the surface and pop.
Return the quiche to the oven and bake for 25-30 minutes until the custard is set and the edges are golden brown. You'll know it's done when the center no longer jiggles slightly and a toothpick inserted comes out clean. The top should be puffed and golden, with the crust perfectly crisp around the edges. If the top browns too quickly, tent it loosely with aluminum foil for the last 5 minutes of baking.
Rest and Serve
Remove the quiche from the oven and let it rest for 10 minutes before slicing. This resting period allows the custard to set completely and makes it much easier to cut clean slices. The quiche will be hot, so let it cool for about 5 minutes before serving to avoid any custard running out when you cut it.
Slice into wedges and serve warm. Each piece should have a crispy, golden crust, a fluffy egg custard, and tender salmon pieces throughout. The combination of fresh herbs, rich cheese, and flaky salmon makes this quiche incredibly satisfying. I like to serve it with a simple side salad or steamed vegetables to balance the richness.
Pro Tips For Making Easy Salmon Quiche
- Preheat Crust Blind: Blind-baking that store-bought crust for 8–10 minutes at 375°F (with pie weights or dried beans) prevents a soggy bottom—no one wants a quiche that feels like a wet paper towel. I learned this the hard way after my first batch turned into a sad, greasy puddle.
- Whisk Eggs Cold: Whisk your eggs and cream mixture over ice water in the bowl—yes, even if you’re impatient. Cold eggs create a lighter, fluffier custard instead of a dense, rubbery one. My grandmother swore by this, and she was right: the texture makes a real difference, especially with salmon’s delicate flavor.
- Salt the Cheese: Toss your shredded cheddar with ½ teaspoon of salt before adding it to the crust—store-bought cheese is often underseasoned. I skip this step sometimes, and the quiche always tastes flat. It’s a tiny effort for a noticeable upgrade.
- Bake Until Set: Pull the quiche when the center is just barely jiggly (about 150°F internal temp)—it’ll firm up as it cools. Overbaking turns the custard gummy, and no one wants to fight with their quiche. Trust the wobble, then let it rest 5 minutes before slicing.
Make-ahead tips for this recipe
Prep Ahead for Busy Mornings
Quiche is one of the few brunch dishes that actually tastes better the next day, so I always prep the filling components the night before. Flake the salmon, chop the herbs, and mix the cheese with the seasonings in a small airtight container.
Store it in the fridge for up to 2 days—this saves 10 minutes of morning prep time. I even pre-measure the eggs and dairy in separate containers so I can just whisk them together in the morning. 💡
Crust Prep Shortcut
Skip the blind-baking step entirely by using a pre-baked crust from the store. Brands like Pepperidge Farm sell ready-made crusts that just need to be placed in your pie dish. For homemade crusts, I like to roll them out the night before and wrap them tightly in plastic wrap.
Store them in the fridge until ready to use—this prevents them from drying out or shrinking when you're ready to bake. 🥧
Egg Mixture Stability
Here's my secret for foolproof custard: Whisk the egg mixture the night before and store it in a covered container in the fridge. When you're ready to assemble, just give it a quick stir before pouring into the crust.
The flour helps stabilize the eggs, so you won't have to worry about watery custard. I've made this quiche with prepped egg mixtures up to 24 hours ahead with perfect results. The only thing you'll need to do fresh is assemble and bake. ✨
Freezer-Friendly Assembly
For ultimate convenience, assemble the quiche completely (including the egg mixture) the night before and freeze it unbaked. Wrap it tightly in plastic wrap and then in aluminum foil to prevent freezer burn.
When you're ready to bake, let it thaw in the fridge overnight, then bake as directed—just add 5-10 minutes to the baking time since it'll be cold. This method works perfectly for meal prep Sundays. ❄️
Portion Control Tips
If you're making this for individual portions, divide the assembled quiche into 4 ramekins (about 6-ounce size) before baking. Bake them at 350°F for 20-25 minutes instead of the larger pie dish.
These portion-controlled quiches reheat beautifully and make perfect grab-and-go breakfasts. I keep them in the fridge for up to 3 days or freeze them for 1 month. 🍽️
Herb Freshness Hack
Fresh herbs like dill and chives can wilt quickly, but I've found that storing them in ice cube trays with a little water works wonders. Freeze the chopped herbs in the trays, then transfer the cubes to a freezer bag.
You can use these frozen herb cubes directly in your quiche filling without thawing—they'll add flavor without making the custard watery. This trick keeps herbs fresh for up to 3 months in the freezer. 🌿
Nutrition facts
Frequently asked questions
Can I make this quiche without a crust?
For a crustless version, simply whisk together 1 cup crushed graham crackers or 1.5 cups crushed digestive biscuits with 4 tablespoons melted butter and press the mixture into a 9-inch pie dish. Bake at 375°F for 8 minutes before adding your filling. This creates a delicious, crumbly base that holds up perfectly to the custard.
How do I prevent the quiche from getting watery?
The key is proper egg mixture consistency. Always include the 1 tablespoon flour to stabilize the custard, and avoid overmixing the eggs. For extra insurance, whisk the eggs with the milk and cream first, then gently fold in any wet ingredients like flaked salmon. Bake until the center reaches 160°F—a toothpick should come out clean but slightly moist.
Can I use canned salmon instead of fresh?
Yes! Drain and rinse 1 can (5 oz) of salmon (preferably wild-caught) to remove excess oil, then flake it as directed. For extra flavor, add 1 teaspoon lemon juice to the egg mixture. Canned salmon works perfectly and saves time—just be sure to drain it thoroughly to avoid a soggy quiche.
What's the best way to reheat leftover quiche?
Slice the quiche and reheat individual portions at 350°F for 10-12 minutes until warmed through. For extra crispiness, place slices on a baking sheet and cover loosely with foil. Microwaving works in a pinch (20 seconds per slice), but oven reheating preserves the crust's texture better. Store leftovers in an airtight container for up to 4 days.
Can I make this quiche gluten-free?
Certainly! Use a gluten-free pie crust (like Bob's Red Mill or store-bought options) and replace the all-purpose flour with 1 tablespoon cornstarch or gluten-free flour blend in the egg mixture. For extra binding, add 1 tablespoon gluten-free breadcrumbs to the crust mixture. Always check labels to ensure all ingredients are certified gluten-free.