
Side Dishes
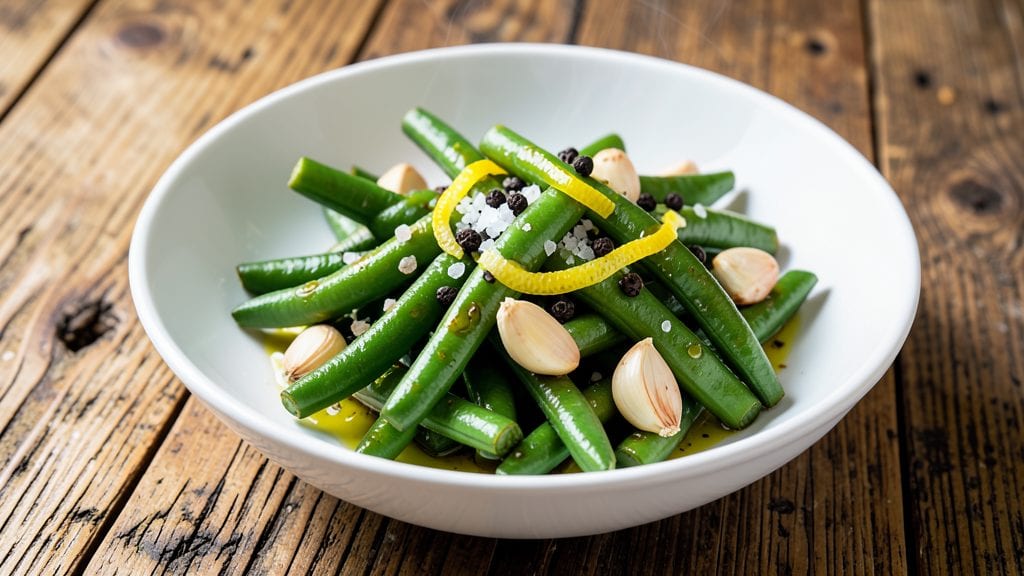
Nana's green beans recipe delivers that perfect balance of crisp-tender texture and smoky garlic flavor that makes every bite unforgettable. The secret lies in a precise cooking method that preserves freshness while building deep, savory notes—something I learned from my grandmother's kitchen.
She always insisted on high heat and just enough salt to enhance the natural sweetness of the beans without overpowering them.
What sets this recipe apart is the smoky garlic kiss achieved through a simple technique: toasting the garlic until fragrant but never burnt, then letting it infuse into the beans while they crisp up in the pan.
This method transforms simple green beans into a side dish that steals the show at any table. The process takes just 15 minutes but delivers restaurant-quality results with minimal effort.
By the time you're done, you'll have vibrant green beans with crisp edges and tender centers, each one coated in that irresistible smoky garlic aroma. The aroma alone will have everyone asking what's for dinner before you even serve it.
This is the kind of side dish that pairs perfectly with roasted meats, grilled fish, or even as a standalone vegetable plate.
Whether you prefer them slightly crispy or perfectly tender, this recipe adapts to your preference while maintaining that authentic family-style flavor. The best part? It's a technique you can master in one try—no complicated steps, just pure, satisfying results. Let's get cooking!
Ingredients for nana's green beans
Nine simple ingredients transform into Nana's legendary crisp-tender green beans with smoky garlic aroma.
| Ingredient | Amount | Notes |
|---|---|---|
| Fresh Green Beans 🥦 | 1 ½ lb | Trimmed, cut into 2-inch pieces |
| Garlic Cloves 🧄 | 6 cloves | Peeled, left whole for toasting |
| Extra-Virgin Olive Oil 🫒 | ¼ cup | High quality, fruity flavor |
| Kosher Salt 🧂 | 1 ½ tsp | Fine grain preferred |
| Black Peppercorns 🌶️ | ½ tsp | Freshly cracked preferred |
| Lemon Juice 🍋 | 1 tbsp | Freshly squeezed, optional |
| Fresh Parsley 🌿 | ¼ cup | Chopped, for garnish |
| Red Pepper Flakes 🌶️ | ¼ tsp | Optional for heat |
| Butter 🧈 | 1 tbsp | Unsalted, for finishing |
The green beans are the star, so pick fresh, vibrant ones—look for bright green, crisp stems at the grocery store. Trader Joe's or local farmers markets have the best quality, but any store's fresh produce section works. For the garlic, buy whole bulbs and separate the cloves yourself—they stay fresher longer. The key is toasting them until fragrant but never browned, which unlocks that deep, smoky flavor Nana always talked about. I usually grab organic garlic from the bulk bins at Whole Foods—it's worth the extra few cents for that extra punch.
No fresh parsley? Dried oregano at half the amount works in a pinch, though it won't have the same bright finish. Short on lemon juice? A splash of apple cider vinegar gives a similar tang. Want more heat? Add cayenne pepper instead of red pepper flakes—just start with half the amount. The butter at the end is non-negotiable though—it's what makes those crisp edges sing. If you're watching calories, use olive oil instead and don't skimp on the garlic. The olive oil should be extra-virgin—none of that cheap stuff. It makes all the difference in the final flavor.
These keep best in the fridge for 3-4 days if you make them ahead, but honestly they're even better fresh. Store them in an airtight container with a paper towel to keep them crisp. I always make a double batch—one for dinner, one for lunch the next day. The garlic aroma lingers for hours, so if you're sensitive to it, store the beans separately from other foods. Freezing isn't recommended since it ruins the texture, but you can reheat them gently in a skillet if needed. Just don't overcook—these are meant to be served hot and crisp!
Why You'll Love This Recipe
- One-Pan Magic: I swear by this—just toss the beans, garlic, and oil in one skillet, and let the heat do the work. No chopping boards, no extra pots, just pure, simple satisfaction.
- Garlic Kiss: That first bite? Crispy beans with garlic so tender it melts into the olive oil—honestly, it’s the kind of flavor that makes you reach for seconds without thinking.
- Weeknight Reliable: It’s my go-to when I’m too tired to fuss: reheats perfectly for lunch, pairs with everything from grilled chicken to sandwiches, and even my picky kid asks for it.
- Budget Win: Fresh green beans are cheap, and this recipe stretches them further than any fancy side. Plus, the leftovers taste just as good cold in salads—minimal cost, maximum flavor.
Step-by-step instructions for Nana's green beans recipe
Here's how to make these crisp-tender green beans with that perfect smoky garlic flavor Nana always nailed.
Prep the Green Beans for Perfect Texture
Start by trimming the ends off all 1.5 lb of fresh green beans using a sharp knife. I cut them into 2-inch pieces - not too long or they'll get mushy, not too short or they'll overcook. Spread them out on a clean kitchen towel and pat them completely dry. This step is crucial because any moisture will steam the beans instead of letting them develop that beautiful crisp-tenderness.
While the beans are drying, crack the 0.5 tsp of black peppercorns using a mortar and pestle or the flat side of your knife. Freshly cracked pepper gives that much better flavor than pre-ground. Keep the peppercorns whole for now - we'll toast them with the garlic later.
Toast the Garlic for Deep Flavor
Heat a large skillet over medium-low heat and add the 0.25 cup of extra-virgin olive oil. Let it warm for about 1 minute until it's hot but not smoking. Add the 6 whole garlic cloves and cook them for 2-3 minutes, stirring occasionally, until they're golden brown and fragrant.
This is where the magic happens - the garlic should be golden, not burnt. If it starts to darken too quickly, reduce the heat. Remove the garlic from the pan with a slotted spoon and set aside on a paper towel to drain. Leave the oil in the pan - we'll use it for cooking the beans. The toasted garlic will add that irresistible smoky depth to your dish.
Cook the Green Beans to Crisp-Tenderness
Return the skillet to medium heat and add the prepared green beans in a single layer. Don't crowd the pan or they'll steam instead of getting crispy. Sprinkle with 1.5 tsp of kosher salt and the 0.25 tsp of red pepper flakes (if using). Cook for 5-6 minutes, stirring occasionally, until the beans are bright green and just beginning to soften.
Here's the thing - you want them to be tender but still hold their shape. They should be bright green with just a hint of crispness. If you like them extra crisp, cook them for 3-4 minutes less. The beans will continue cooking slightly when you add the garlic back in.
Finish with Butter and Bright Flavors
Add the toasted garlic cloves back to the skillet along with the 1 tbsp of butter. Stir everything together and cook for another 1-2 minutes until the butter melts and coats the beans. The combination of the toasted garlic and butter creates that rich, velvety finish that makes this dish so special.
Finish with the 1 tbsp of lemon juice and toss everything together. The acidity brightens all the flavors and cuts through the richness of the butter. Taste and adjust the seasoning if needed - you might want to add a pinch more salt or a splash more lemon juice to suit your taste.
Garnish and Serve Immediately
Transfer the green beans to a serving dish and sprinkle with the 0.25 cup of chopped fresh parsley. The parsley adds a fresh pop of color and flavor that makes the dish look and taste even better. Serve the green beans immediately while they're hot - they won't keep well if left sitting.
These green beans should be crisp-tender with a beautiful golden color from the toasted garlic. Each bite should deliver that perfect combination of crisp texture, smoky garlic flavor, and bright lemon finish. They're perfect as a side dish or even as a main course with some crusty bread.
Pro Tips For Making Nana'S Green Beans
- TRIM BEANS AT THE END: I used to snap off the ends before cooking, but that’s wasted effort—just trim after blanching when the ends soften and pull away easily. A quick snip with kitchen shears afterward keeps your hands clean and saves 5 minutes of prep.
- CRUSH GARLIC, DON’T MINCE: Whole garlic cloves burn fast and turn bitter. Smash them with the flat side of your knife first, then chop—this releases flavor without scorching. I learned this after one disastrous batch where the garlic tasted like soap.
- SALT THE WATER LIKE THE SEA: Toss the beans in boiling salted water (about 1½ tablespoons per quart) for the first 2 minutes—this jumpstarts flavor penetration. Skimp here, and your beans taste bland no matter how much you season later.
- TOSS WITH OIL IMMEDIATELY: Drain the beans, then hit them with a splash of olive oil while they’re hot—this seals in moisture and gives them that glossy, restaurant-worthy finish. I used to wait, and they’d dry out or steam instead of shine.
Perfect pairings for these flavors
Classic Meat Pairings
Nana's green beans shine alongside grilled ribeye steaks—the smoky garlic flavor complements the beef's charred crust beautifully. I always serve them together with a red wine reduction drizzle. For smoked brisket, the beans' brightness cuts through the rich, fatty meat, making every bite more balanced. 🥩
With baked chicken thighs, the crisp-tender texture of the beans adds a satisfying contrast to the tender meat. I like to serve them with a lemon-herb butter on the chicken to mirror the lemon finish in the beans.
For pork chops, the garlic notes in the beans enhance the savory depth of the meat.
Fish and Seafood
Grilled salmon pairs perfectly with these green beans—their natural sweetness matches the beans' bright acidity. I recommend serving them with a dill yogurt sauce to complement both dishes. Pan-seared cod also works wonderfully, especially with a white wine-lemon sauce that echoes the lemon in the beans. 🐟
For shrimp skewers, the crisp texture of the beans provides a delightful contrast to the tender shrimp. Serve them with a garlic aioli for dipping, which ties into the garlic flavor in the beans. Even grilled scallops benefit from the beans' acidity, balancing their rich, buttery texture.
Vegetarian Main Courses
These green beans elevate mushroom risotto by adding freshness and texture. The garlic in the beans enhances the earthy flavors of the mushrooms. For stuffed bell peppers, the beans' bright acidity cuts through the richness of the cheese filling. 🌱
With grilled portobello mushrooms, the beans' crispness contrasts beautifully against the meaty texture of the mushrooms. Serve them with a balsamic glaze to tie all the flavors together. Even tofu stir-fry benefits from the beans' smoky depth, adding complexity to the dish.
Bread and Dips
Serve these green beans with crusty sourdough bread for scooping up any leftover sauce. The beans' crisp texture pairs wonderfully with the bread's chewy interior. For a dip, try a garlic-herb hummus that mirrors the flavors in the beans. 🥖
A warm pita pocket filled with the beans and a sprinkle of feta cheese makes a fantastic handheld meal. The beans also work well with flatbread for a Mediterranean-inspired twist. For a lighter option, serve them with endive leaves and a lemon vinaigrette for dipping.
Nutrition facts
Frequently asked questions
Can I use frozen green beans instead of fresh?
Fresh green beans work best for that perfect crisp-tenderness, but you can use frozen in a pinch. Just thaw them completely first and pat them very dry to prevent steaming. You may need to reduce cooking time by 1-2 minutes since frozen beans start slightly softer. The texture won't be quite as crisp, but the smoky garlic flavor will still shine through!
How do I know when the garlic is toasted enough?
The garlic should be golden brown and smell deeply fragrant—not burnt or bitter. Test one clove by crushing it between your fingers: it should release a rich, nutty aroma. If it smells sharp or acrid, it's overdone. Toasting just until golden ensures that perfect smoky flavor without bitterness that can overpower the beans.
Can I make this recipe ahead of time?
These green beans are best served immediately for that perfect crisp-tender texture, but you can prep components ahead. Toast the garlic in advance and store it in the fridge for up to 3 days. For the beans, blanch them in boiling water for 2 minutes, then shock in ice water before storing in an airtight container with a paper towel. Reheat gently in a skillet with fresh olive oil and garlic.
What if I don't have fresh parsley?
No problem! Use 0.25 cup of chopped fresh basil for a slightly sweeter finish, or 0.125 tsp of dried parsley (half the amount) for a milder flavor. For extra brightness, try chopped chives or a pinch of lemon zest. The key is adding something fresh to balance the rich garlic and butter flavors.
Why do my green beans turn out mushy?
Overcooking is the most common cause—these beans should cook just 5-6 minutes total. Crowding the pan also steams them instead of letting them crisp. Use a large skillet and cook in batches if needed. Always start with dry beans and avoid adding too much liquid (like broth) which can make them soft. The butter at the end should coat, not pool.