
Snacks
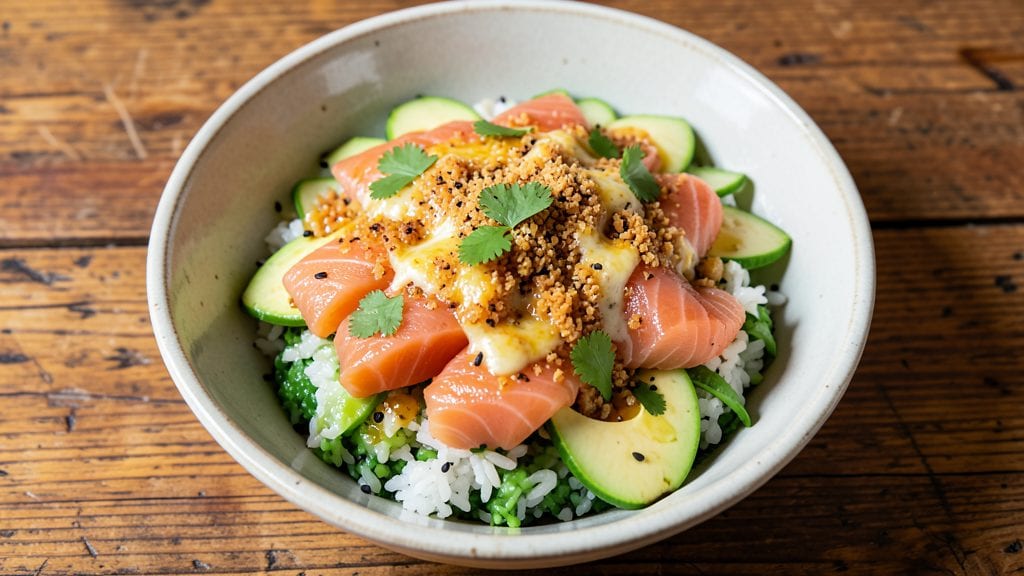
This original sushi bake recipe transforms traditional sushi rolls into a crispy, cheesy fusion dish that’s perfect for parties or a fun weeknight dinner. The secret lies in layering cooked sushi rice, raw fish, avocado, and cucumber with melted cheese, then baking until golden and bubbly.
I developed this recipe after craving something familiar yet elevated—something that keeps the fresh flavors of sushi while adding the comfort of a crispy, cheesy top.
The beauty of this dish is its versatility—you can customize it with your favorite sushi ingredients while ensuring a crispy crust that holds up perfectly. The baking process creates a satisfying crunch on top while keeping the inside tender and flavorful.
It’s a dish that bridges two worlds: the freshness of sushi and the indulgence of baked comfort food. Whether you're feeding a crowd or treating yourself, this recipe delivers restaurant-quality results with minimal effort.
What makes this sushi bake truly special is the balance of textures and flavors—creamy avocado, fresh cucumber, tender fish, and the rich, melty cheese all come together in one delicious bite.
The crispy top adds a satisfying crunch that contrasts beautifully with the soft layers beneath. This isn’t just a snack; it’s a showstopper that’s sure to impress anyone who tries it.
Ready in just 30 minutes, this recipe is perfect for those who love sushi but want something heartier and easier to share. The best part?
You can prep everything ahead of time, making it ideal for game day, potlucks, or whenever you’re craving something fun and flavorful. Let’s get baking!
Ingredients for original sushi bake
Six layers of flavor—crispy, creamy, and cheesy fusion magic starts here.
| Ingredient | Amount | Notes |
|---|---|---|
| Sushi Rice 🍚 | 4 cups | Cooked, seasoned with rice vinegar |
| Raw Salmon Slices 🐟 | 12 pieces | Sushi-grade, thinly sliced |
| Avocado Slices 🥑 | 2 whole | Ripe, sliced into thin strips |
| Cucumber Slices 🥒 | 1 whole | Seedless, thinly sliced |
| Shredded Mozzarella Cheese 🧀 | 2 cups | Low-moisture, freshly shredded |
| Shredded Cheddar Cheese 🧀 | 1 cup | Sharp, freshly shredded |
| Japanese Mayonnaise 🥛 | ½ cup | Kewpie preferred for authenticity |
| Soy Sauce 🍶 | 2 tbsp | Low-sodium preferred |
| Sesame Seeds 🌾 | 1 tbsp | Toasted for extra crunch |
| Panko Breadcrumbs 🍞 | ½ cup | For extra crispy topping |
| Extra-Virgin Olive Oil 🫒 | 2 tbsp | For brushing layers |
| Garlic Cloves 🧄 | 2 cloves | Minced for flavor boost |
| Salt 🧂 | 1 tsp | Kosher preferred |
| Black Pepper 🌶️ | ½ tsp | Freshly ground |
The sushi rice is your foundation—short-grain Japanese rice is non-negotiable for that sticky, perfect texture. Koshihikari or Calrose are my go-tos, and you can find them at Asian markets or the international aisle of most grocery stores. If you're using pre-made sushi rice, check the label—some brands add too much vinegar, which can make the bake taste sour. For the fish, sushi-grade salmon is a must—this isn’t a dish where you want to take chances. Grab it from the seafood counter, and if it's not already sliced, ask for thin cuts—about 1/8-inch thick. The avocado and cucumber? Buy the pre-sliced packs from the produce section—they save time and stay fresher longer.
No Kewpie mayo? Hellmann's or Best Foods work in a pinch, though the flavor won’t be quite as rich. Running out of sesame seeds? Toasted sunflower seeds give a similar crunch (just skip the garnish step). The cheeses are where you can get creative—Pepper Jack instead of cheddar adds a kick, or goat cheese for something tangy. For the crispy topping, Japanese panko is ideal, but regular panko or crushed cornflakes will do. Pro tip: Mix the panko with a little extra cheese before topping for a cheesier, crispier crust. And if you're short on time, microwave the cheese layer for 30 seconds before baking to speed up the melt.
This bake tastes even better the next day—make extra and freeze portions for lazy weeknights. Store leftovers in an airtight container for up to 4 days, or freeze for 2 months. To reheat, cover with foil and bake at 350°F for 10-15 minutes until bubbly. The crispy top softens when reheated, but a quick broil at the end brings it back to life. For serving, garnish with extra sesame seeds and a drizzle of soy sauce—trust me, it makes all the difference.
Why You'll Love This Recipe
- No-Roll Required: I swear by this when I’m too tired to shape rice. Just spread the sushi rice, arrange the salmon and avocado, then top with cheese—no hand cramps, no messy rolls. The oven does all the work while I sip my tea.
- Melty Magic Combo: That shredded mozzarella isn’t just a topping—it’s the star. It turns crispy at the edges while staying gooey inside, and somehow makes the raw salmon taste even fresher. Honestly, I’ll take this over takeout any day.
- Lunchbox Hero: Between us, this is my go-to for meal prep. Slice it into squares, pack it in containers, and boom—you’ve got a lunch that feels fancy but costs next to nothing. My kids actually eat their veggies when they’re disguised like this.
- Leftovers That Don’t Suck: Most baked sushi gets soggy after day one, but not this. The cheese keeps everything sturdy, and the flavors only get better as the rice absorbs the salmon’s juices. I’ve reheated portions three times and still crave it.
Step-by-step instructions for crispy sushi bake fusion magic
Here's how to create the perfect crispy-topped sushi bake with melty cheese and all the flavors you love.
Prepare the Crispy Cheese Topping
In a medium bowl, combine the 2 cups shredded mozzarella cheese, 1 cup shredded cheddar cheese, 0.5 cup panko breadcrumbs, 1 tbsp toasted sesame seeds, 1 tsp salt, and 0.5 tsp black pepper. Mix until the breadcrumbs are evenly distributed throughout the cheese mixture. This creates the perfect crispy topping that'll give your sushi bake that irresistible crunch.
Set aside while you prepare the rest of the ingredients. The panko breadcrumbs will add texture while the cheeses provide that gooey, melty goodness. I like to use freshly toasted sesame seeds for that extra nutty flavor that complements the sushi perfectly.
Assemble the Sushi Bake Layers
Preheat your oven to 375°F. Lightly grease a 9x13-inch baking dish with 1 tbsp of the extra-virgin olive oil to prevent sticking. Spread the 4 cups cooked sushi rice evenly in the bottom of the dish, pressing down gently to create a solid base.
Next, arrange the 12 pieces raw salmon slices evenly over the rice, slightly overlapping them if needed. Spread the 2 whole avocado slices and 1 whole cucumber slices over the salmon. Drizzle the remaining 1 tbsp extra-virgin olive oil over the top and sprinkle with the 2 tbsp soy sauce. This layering creates the perfect balance of textures and flavors in every bite.
Add the Flavorful Mayonnaise Layer
In a small bowl, mix together the 0.5 cup Japanese mayonnaise with the 2 minced garlic cloves. Spread this mixture evenly over the top of your sushi bake. The mayonnaise acts as a binding agent that helps hold everything together while adding that rich, creamy flavor we all love in sushi rolls.
Press down gently on the top layer to ensure everything stays in place during baking. This step is crucial for that authentic sushi bake experience. The mayonnaise will also help create that beautiful golden crust on top when it bakes.
Create the Crispy Cheese Topping
Sprinkle the cheese mixture you prepared earlier evenly over the top of the sushi bake. Make sure to cover the entire surface completely. The cheese should be distributed in an even layer that will create that perfect crispy topping when baked.
Place the baking dish on the middle rack of your preheated oven. Bake for 20-25 minutes until the top is golden brown and the cheese is fully melted and bubbly. You'll know it's done when the cheese has turned a beautiful golden color and the edges are slightly crispy.
Rest and Serve
Remove the sushi bake from the oven and let it rest for 5 minutes before serving. This resting time allows the layers to set slightly and makes it easier to slice. The cheese will continue to melt slightly, creating that perfect gooey texture.
Cut into 6 equal portions and serve immediately. Each bite will give you that perfect combination of crispy cheese topping, creamy avocado, fresh cucumber, and flavorful salmon. This fusion dish brings together all the best elements of sushi and baked casseroles for an amazing meal everyone will love.
Pro Tips For Making Original Sushi Bake
- Prep Avocado Last: Avocado turns brown faster than you think—especially when baked. Slice it right before assembling the dish, toss the pieces in a tiny splash of lemon juice, and keep them in cold water until you’re ready to layer. I used to do this ahead of time, and by baking, the edges were gray and sad.
- Bake Salmon First: Raw salmon in a hot oven? No thanks. Lightly pan-sear the salmon slices (2 minutes per side) before assembling the bake to lock in flavor and prevent overcooking when the cheese melts. The edges will stay tender, not rubbery.
- Press the Rice Hard: Sushi rice is the backbone here—don’t skimp on packing it down. Use a damp paper towel to press the rice into the baking dish in an even layer. This keeps it from shifting when you add toppings and ensures the salmon and cucumber stay in place (no sad, sunken slices).
- Add Cheese in Stages: Mozzarella loves to pool. Start with half the cheese on top, bake until it’s just starting to melt, then sprinkle the rest and finish under the broiler for 1-2 minutes. This gives you a golden crust without a gooey mess sliding off the plate.
Flavor customization for original sushi bake
Spicy Kick Fusion
Add 1 tbsp of sriracha or 1 tsp of gochujang to the mayonnaise layer for a fiery twist. For extra heat, mix ½ tsp of red pepper flakes into the cheese topping before baking.
I love pairing this with spicy mayo drizzled on top after baking—just mix 2 tbsp Kewpie mayo with 1 tsp sriracha and a pinch of honey. 🌶️
Creamy Avocado Boost
Mash ½ avocado with 1 tbsp Greek yogurt and 1 tsp lemon juice, then spread this mixture over the salmon layer before adding the cheese.
This adds a luscious, tangy creaminess that balances the crispy top. For extra richness, fold in 1 tbsp cream cheese into the mashed avocado. 🥑
Umami Bomb Layer
Sauté 2 tbsp finely chopped shiitake mushrooms with 1 tsp soy sauce and 1 tsp sesame oil until golden, then spread them over the rice layer before adding the salmon. For deeper umami, mix 1 tbsp fish sauce into the mayonnaise layer—just be mindful of the saltiness. 🍄
Sweet and Tangy Glaze
Brush the baked sushi bake with a glaze made from 2 tbsp hoisin sauce mixed with 1 tsp rice vinegar and ½ tsp honey. This adds a sweet-savory contrast that cuts through the richness. For a quicker option, drizzle with teriyaki sauce after baking. 🍯
Protein Swap Options
Replace salmon with shrimp tempura bites (lightly battered and fried) for a crispy texture, or use thinly sliced scallops seared in a pan first. For a vegetarian version, swap the fish for marinated tofu or grilled eggplant slices. Always pre-cook proteins before layering. 🐟
Herb and Citrus Garnish
Finish with fresh cilantro leaves and microgreens for a pop of color, or a squeeze of yuzu juice (or regular lemon) before serving. For a smoky touch, sprinkle toasted nori flakes on top right after baking. The acidity brightens all the flavors. 🍋
Nutrition facts
Frequently asked questions
Can I use cooked fish instead of raw salmon in this recipe?
If you prefer cooked fish, use pre-cooked shrimp, seared scallops, or grilled tuna. Just make sure to slice it thinly and arrange it evenly over the rice. The texture will be slightly different but still delicious. For best results, pat the fish dry before layering to prevent excess moisture.
How do I prevent the sushi rice from getting soggy?
To keep the rice crispy, spread it in a single even layer at the bottom of your baking dish and press down gently. Avoid overmixing the rice with other ingredients, and don’t skip the 5-minute rest before serving. For extra insurance, spread a thin layer of Japanese mayonnaise between the rice and fish layers.
Can I make this recipe ahead of time?
Yes! Assemble the bake up to 24 hours ahead and refrigerate uncovered. When ready to bake, add the cheese topping and bake as directed. For freezing, assemble the dish (without the cheese topping), cover tightly with foil, and freeze for up to 2 months. Thaw overnight in the fridge, then add the cheese topping and bake.
What’s the best way to reheat leftovers?
Cover the leftovers with foil and reheat at 350°F for 10-15 minutes until bubbly. For extra crispiness, broil for 1-2 minutes at the end. The cheese may soften slightly, but a quick broil restores that golden crust. Store leftovers in an airtight container for up to 4 days.
Is this dish kid-friendly?
With a few tweaks, yes! Swap raw salmon for cooked crab sticks or grilled chicken, and use mild cheddar instead of sharp cheddar. Omit the soy sauce or reduce it to 1 tbsp to keep flavors gentle. Kids love the crispy cheese topping—it’s like a cheesy sushi roll they’ll actually eat!