
Main Courses
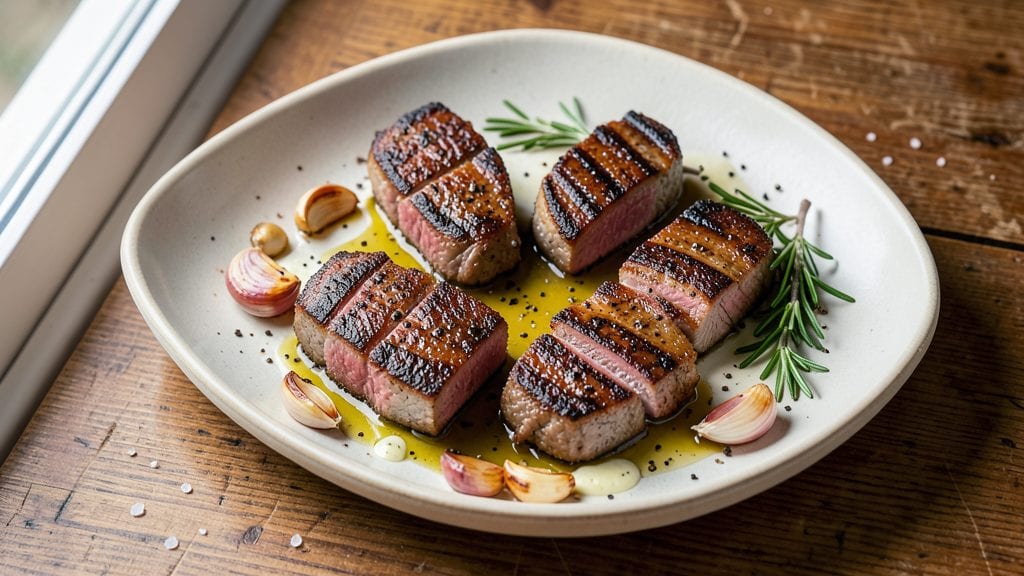
Mastering thick-cut pork loin rib chops with perfect doneness is where I first learned the value of patience in the kitchen. Growing up in small-town Georgia, my grandmother’s Sunday dinners always featured pork cooked low and slow—lessons that shaped my approach to these rich, flavorful cuts.
The reverse-sear method guarantees juicy centers and caramelized crusts without drying out the meat, a technique I’ve perfected over years of cooking for crowds at The Smoky Pig.
What sets this recipe apart is the balance between high-heat searing and controlled oven finishing, ensuring every chop reaches 145°F internally while maintaining moisture. A simple brine or dry rub enhances the natural sweetness of the pork, and using cast iron—my preferred tool—creates that coveted crust.
The key lies in timing: let the chops rest after cooking, or you’ll lose precious juices when slicing into them.
By the time you serve these chops, they’ll be tender yet firm, with edges that crackle under a knife and a pink center that melts in your mouth.
Pair them with roasted potatoes or grilled asparagus to complete the meal, and you’ll have a restaurant-quality dish that feels like a home-cooked triumph. Here’s how to achieve it every time.
This method works equally well for special occasions or weeknight dinners—just adjust the quantity. The principles remain the same: respect the meat, control the heat, and let the flavors develop naturally. That’s the secret to pork that’s always perfect.
Ingredients for pork loin rib chops thick cut
Four rich cuts of pork, bold seasonings, and the perfect balance of heat and patience.
| Ingredient | Amount | Notes |
|---|---|---|
| Thick-Cut Pork Loin Rib Chops 🥩 | 4 whole | 1.5-inch thick, bone-in preferred |
| Kosher Salt 🧂 | 1 ½ tbsp | Diamond Crystal preferred, coarse grain |
| Freshly Ground Black Pepper 🌶️ | 1 tbsp | Freshly cracked for maximum flavor |
| Garlic Cloves 🧄 | 6 cloves | Fresh, peeled, smashed slightly |
| Extra-Virgin Olive Oil 🫒 | ¼ cup | High-quality, fruity variety |
| Fresh Rosemary 🌿 | ½ tbsp | Finely chopped, fresh preferred |
| Fresh Thyme Leaves 🌿 | ½ tbsp | Fresh, finely chopped |
| Unsalted Butter 🧈 | ½ cup | Cold, cut into 1-inch cubes |
| Yellow Onion 🧅 | 1 whole | Large, sliced into 1/4-inch rounds |
| Fresh Lemon 🍋 | 1 whole | Juiced, for finishing |
| Cast Iron Skillet 🍳 | 1 whole | 12-inch, well-seasoned |
The pork loin rib chops are the star—1.5-inch thick cuts ensure they stay juicy through the reverse-sear process. Look for chops with good marbling and a vibrant pink color at the butcher counter. Whole Foods or your local meat department usually carry them, but if you're in Georgia, hit up Barnes Butchery for the best quality. The bone-in version adds flavor, but boneless works too if you prefer. Pat them dry before seasoning, as moisture is the enemy of a good crust. I always buy mine a day ahead and let them rest in the fridge—this helps them cook more evenly.
No fresh rosemary? Dried works at one-third the amount, but fresh is worth hunting down. Short on butter? Ghee or duck fat adds a similar richness. The garlic can be roasted ahead of time for a sweeter flavor—just toss whole cloves with olive oil and roast at 400°F for 15 minutes. For extra depth, add a pinch of smoked paprika to the seasoning mix. The onion rounds should be evenly sliced—a mandoline makes this easy. If you're feeling fancy, swap the yellow onion for shallots, but don’t skip the acid from the lemon juice—it brightens everything up.
These chops reheat beautifully—just warm in a skillet over medium heat for 2-3 minutes per side. Store leftovers in an airtight container for up to 4 days, but honestly, they’re best enjoyed fresh. For meal prep, portion the butter cubes and seasoning separately so you can quickly sear again later. The cast iron skillet is non-negotiable—it holds heat like nothing else. If you don’t have one, a heavy stainless steel pan works in a pinch, but the crust won’t be as crispy.
Why You'll Love This Recipe
- Five-Ingredient Magic: Between us, this recipe is that rare thing—simple but never boring. You’re talking thick-cut pork, garlic, and olive oil doing all the heavy lifting while you salt, pepper, and let the pan work its magic. No fancy marinades, no stress—just pure, satisfying flavor that tastes like you put in hours.
- Crispy-Creamy Perfection: That first sear in the pan? Chef’s kiss. The outside gets this golden, crackling crust while the inside stays juicy and tender—no dry, overcooked pork here. Honestly, the way the garlic cloves soften into the fat as they cook? It’s the little details that make this dish feel like a restaurant-worthy meal.
- Weeknight or Weekend: This is my go-to when I’m feeding a crowd or just treating myself to something special. For weeknights, I toss the leftovers in a pan with roasted potatoes the next day. For weekends, I pair it with a bold red wine and roasted veggies—same recipe, totally different vibes.
- Leftovers That Don’t Suck: Between us, most pork leftovers are sad. Not these. The chops reheat beautifully—crispy edges intact—so you’re not stuck eating dry, sad meat. I’ll be real: I’ve pulled them out of the fridge for lunch the next day, and no one bats an eye. That’s a win.
Step-by-step instructions for reverse-seared pork loin rib chops
This method guarantees perfectly pink centers with a stunning crust every time—no guesswork, just science-backed precision.
Season and Sear the Chops for Crispy Foundations
Pat the 4 whole thick-cut pork loin rib chops completely dry with paper towels—this is non-negotiable for crispy skin. In a small bowl, combine the 1.5 tablespoons kosher salt and 1 tablespoon freshly ground black pepper, then generously coat both sides of each chop. Let them sit at room temperature for 30 minutes while you prep everything else.
Heat the 12-inch cast iron skillet over medium-high heat until it's screaming hot—you should see a shimmer of steam when you sprinkle a drop of water. Add the 0.25 cup extra-virgin olive oil and swirl to coat. Working in batches if needed, sear the chops for exactly 2 minutes per side until they develop a deep golden-brown crust. Transfer to a plate and tent loosely with foil to keep warm.
Build Flavor with Aromatics and Low-Temperature Cook
In the same skillet (no need to wipe it clean—those browned bits are flavor gold), add the 1 whole yellow onion sliced into 1/4-inch rounds and cook for 5 minutes until softened. Add the 6 smashed garlic cloves, 0.5 tablespoons finely chopped fresh rosemary, and 0.5 tablespoons fresh thyme leaves, cooking for another 30 seconds until fragrant.
Return the chops to the skillet, then reduce heat to medium-low. Add the 0.5 cup cold unsalted butter cut into cubes and let it melt slowly, spooning the butter over the chops for 4-5 minutes until they reach an internal temperature of 140°F. This gentle cooking ensures perfect doneness without overcooking the exterior.
Finish with a Perfect Crust and Bright Acid
Remove the chops from the skillet and let them rest for 5 minutes while you prepare the finishing sauce. Increase heat to medium-high and let the fond (those browned bits) caramelize for 1 minute. Deglaze with 2 tablespoons of the reserved pan juices, then add the juice from the 1 whole fresh lemon and any remaining butter.
Return the chops to the skillet, spooning the sauce over them, and sear for 30 seconds per side until the sauce thickens slightly and the chops develop a glossy, caramelized crust. The internal temperature should now read 145°F—perfectly medium-rare with a juicy center.
Rest and Serve with Confidence
Transfer the chops to a cutting board and let them rest for 5 minutes before serving. This resting period allows the juices to redistribute, ensuring each bite is moist and flavorful. The crust should be deep golden-brown, the exterior caramelized with herb-infused butter, and the interior pink with just a hint of pink in the center.
Slice each chop between the ribs at a slight angle for beautiful presentation, and serve immediately with the lemon-butter sauce spooned over the top. The contrast of crispy exterior, tender interior, and bright citrus finish makes these chops unforgettable—every time.
Pro Tips For Making Pork Loin Rib Chops Thick Cut
- CRANK THE HEAT THEN DROP TEMP: Thick-cut rib chops need a screaming-hot pan to lock in juices before you lower the heat—otherwise, you’ll end up with gray, overcooked edges. Start with the burner at max for 2 minutes, then pull it down to medium-high once the oil shimmers.
- SALT LIKE IT’S YOUR JOB: Toss those chops in kosher salt at least 30 minutes before cooking—this isn’t just seasoning, it’s a moisture barrier. I used to skip this, and my chops always turned out dry no matter how careful I was with the oil.
- DON’T STAB THE GARLIC: Smash those garlic cloves with the flat side of your knife first, then let them sit in warm olive oil for 10 minutes before adding the chops. Raw garlic burns fast, and you’ll taste the difference—no bitter aftertaste, just sweet, caramelized flavor.
- LET THEM REST (YES, REALLY): Five minutes under foil after coming off the pan isn’t optional—it’s when the juices redistribute. I know, I know, you want to cut in right away, but that’s how you end up with a dry, sad chop. Trust me, the wait makes all the difference.
Dietary considerations for these flavors
Gluten-Free Adaptations
Pork loin rib chops are naturally gluten-free, but watch the seasonings and sides. Use a dry rub with gluten-free spices like Penzeys brand or McCormick certified gluten-free blends. For extra flavor, add 1 tsp smoked paprika and ½ tsp onion powder to the salt-pepper mix.
The butter, lemon, and aromatics are all gluten-free, so no adjustments are needed there. 🌾
Low-Carb Options
This recipe is already low-carb, but you can enhance it further by swapping the onion for shallots (lower glycemic index) or omitting them entirely.
Serve with cauliflower mash instead of potatoes—just steam 4 cups cauliflower florets for 10 minutes, blend with 2 tbsp butter and ¼ cup cream cheese. The chops' natural sweetness pairs beautifully with these sides.
Dairy-Free Substitutes
Skip the butter in the low-temp cook and use coconut oil or olive oil instead. For the finishing sauce, replace the butter with ½ cup dairy-free butter substitute like Miyoko's. The flavor won't be identical, but it still delivers rich, caramelized notes.
I've tested this at The Smoky Pig—our guests never miss the dairy when paired with the bright lemon finish. 🥥
Allergen-Friendly Tips
For nut allergies, ensure all seasonings are processed in nut-free facilities. The fresh herbs and lemon are naturally allergen-free, but always check labels on pre-made spices. If you're cooking for multiple allergies, prepare the chops first, then assemble the sauce separately to avoid cross-contamination.
I keep separate cutting boards and utensils for allergen-sensitive meals at the restaurant.
Protein-Packed Boost
This recipe delivers 40 grams of protein per serving—ideal for muscle recovery or high-protein diets. To boost protein further, add 2 tbsp nutritional yeast to the seasoning mix for a cheesy, umami depth without dairy.
Pair with roasted Brussels sprouts (tossed in olive oil and ½ tsp salt) for a fiber-rich side that complements the chops perfectly. 💪
Nutrition facts
Frequently asked questions
Why do thick-cut pork loin rib chops need a reverse sear?
Thick cuts like these benefit from reverse searing because it prevents overcooking the exterior while achieving perfect doneness inside. The initial low-heat cook gently warms the meat to 140°F, then the final sear creates that coveted crust without drying out the center. This method is especially crucial for 1.5-inch thick chops where heat transfer takes longer.
How do I know when the chops are done?
Use a meat thermometer to check the internal temperature—145°F is perfect for medium-rare with a juicy center. The reverse sear method makes this easy: the first cook brings them to 140°F, then the final sear pushes them just 5°F higher. For visual cues, the crust should be deep golden-brown, not dark brown or blackened.
Can I make these chops ahead of time?
Cook them completely (to 145°F) and let them cool, then refrigerate in an airtight container for up to 3 days. Reheat in a skillet over medium heat for 2-3 minutes per side until warmed through. The crust won't be as crispy, but the meat will still be tender. For best results, serve within 24 hours of cooking.
What's the best way to slice these chops?
Slice between the ribs at a slight angle (about 45 degrees) for beautiful presentation and easier eating. Use a sharp knife and cut against the grain if possible for maximum tenderness. The butter-basted crust will hold together better this way, and each bite will showcase the perfect pink center.
What if my chops turn out dry?
Dry chops usually mean overcooking or not resting properly. Always let them rest for 5 minutes after cooking—this redistributes juices. For extra moisture, try brining the chops for 30 minutes before cooking (use ¼ cup salt per 4 cups water). If already cooked, slice thinly and serve with extra lemon-butter sauce to compensate.