Main Courses
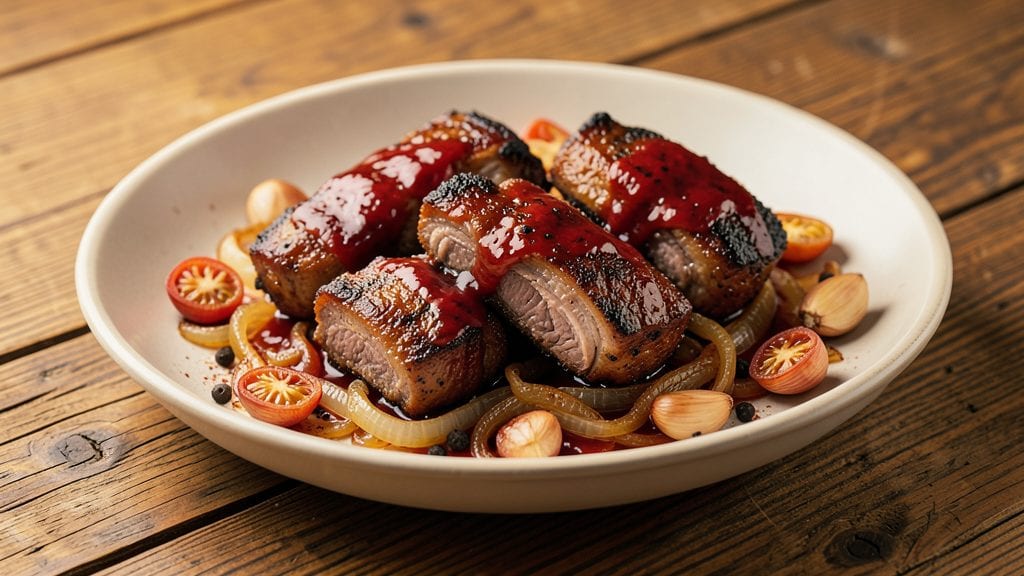
Transforming tough rib tips into melt-in-your-mouth perfection requires patience and precision—this baked rib tips recipe delivers restaurant-quality results with a simple slow-braising technique. The key lies in marinating overnight, then baking at a precise temperature until the meat practically falls apart at the touch.
I’ve perfected this method over countless batches, ensuring every bite is rich, tender, and deeply flavorful without the need for a slow cooker.
What sets this recipe apart is the balance of bold spices and aromatic herbs that penetrate the meat during the long bake. A dry rub of garlic, onion powder, smoked paprika, and black pepper creates a flavorful crust, while a splash of beef broth keeps the meat moist.
The result? Rib tips so tender they’ll have your guests reaching for seconds, all achieved in a single baking dish with minimal effort.
By the time you pull these ribs from the oven, you’ll have a dish that’s impossible to resist—juicy, caramelized edges, and a sauce thickened by the natural juices of the meat.
This recipe is designed for weeknight dinners or special occasions, pairing beautifully with mashed potatoes, crusty bread, or a simple green salad. The best part? No babysitting required—just set it and let the oven work its magic.
For those who love leftovers, this recipe makes even better the next day as the flavors deepen. Whether you’re feeding a family or hosting a dinner party, these baked rib tips will be the star of the show. Let’s get started on creating a dish that’s sure to impress.
Ingredients for baked rib tips
Six ingredients transform tough rib tips into restaurant-quality melt-in-your-mouth perfection.
| Ingredient | Amount | Notes |
|---|---|---|
| Beef Rib Tips 🥩 | 3 lb | Bone-in for maximum flavor |
| Garlic Cloves 🧄 | 8 cloves | Minced for dry rub |
| Onion Powder 🧅 | 2 tbsp | For aromatic depth |
| Smoked Paprika 🌶️ | 1 ½ tbsp | For smoky richness |
| Ground Black Pepper 🌶️ | 1 ½ tbsp | Freshly ground preferred |
| Beef Broth 💧 | 1 ½ cups | Low-sodium preferred |
| Olive Oil 🫒 | 2 tbsp | For searing meat |
| Fresh Rosemary 🌿 | ¼ cup | Chopped, for aroma |
| Fresh Thyme 🌿 | ¼ cup | Leaves only, chopped |
| Brown Sugar 🍯 | 1 tbsp | For caramelization |
| Salt 🧂 | 1 ½ tbsp | Kosher or sea salt |
| Balsamic Vinegar 🍷 | 1 tbsp | For tangy depth |
| Worcestershire Sauce 🧂 | 1 tbsp | For umami kick |
The beef rib tips are the star—look for bone-in cuts at your butcher or grocery store's meat counter. Costco or Whole Foods often carry them pre-cut, but if you're buying a whole pack, ask for them to be trimmed to about 2-inch pieces. Freshness matters here: the meat should have a vibrant red color and feel firm to the touch. If you can't find rib tips, beef chuck roast works in a pinch (cut into chunks), though it won't have the same tender texture. The spices? Penzeys or the bulk bins at natural markets have the freshest, most flavorful options—avoid pre-ground spices that smell dusty.
No fresh rosemary or thyme? Dried works at one-third the amount, but you'll lose some of that aromatic punch. Short on balsamic vinegar? A splash of red wine or even apple cider vinegar does the trick. The beef broth is non-negotiable—low-sodium is key so you don't over-salt the dish. For the dry rub, I like to toast the spices in a dry pan for 30 seconds first (that's where the magic happens). And if you're feeling fancy, swap the Worcestershire for a teaspoon of fish sauce—same umami, different vibe. The olive oil should be something you'd drizzle on bread, not the cheap stuff in a plastic bottle.
These ribs taste even better the next day, so make extra. Store leftovers in an airtight container in the fridge for up to 5 days, or freeze for 3 months—portion them into individual bags for easy reheating. The sauce thickens as it cools, so a splash of beef broth when reheating keeps it luscious. I like to serve these with crusty bread to soak up all that delicious sauce, or over mashed potatoes for a hearty meal. Pro tip: Let the ribs rest for 10 minutes after baking—they'll stay juicier that way.
Why You'll Love This Recipe
- One-Pan Magic: I swear by this recipe because it’s that simple—just toss the rib tips with garlic, paprika, and pepper, then bake. No fancy prep, no mess, and honestly? The oven does all the work while I sip my coffee.
- Smoky, Savory Bang: That smoked paprika and garlic combo? It’s like a hug in your mouth—deep, rich, and just a little bit smoky. The rib tips come out tender with a crust that’s dangerously good, especially when you bite into the juicy center.
- Game for Any Night: Between us, this is my go-to for lazy Sundays or when I need to feed a crowd without stress. Double the batch, freeze half, and boom—you’ve got a meal ready for whenever. (Yes, even on a Tuesday night.)
- Budget-Friendly Feast: Rib tips are cheaper than you’d think, and a single panful stretches across lunches, tacos, or sandwiches. My wallet thanks me, and my family doesn’t even question why I’m always cooking this—because they love it that much.
Step-by-step instructions for baked rib tips
Here's how to transform tough beef rib tips into melt-in-your-mouth perfection with minimal effort.
Sear the Rib Tips for Maximum Flavor
Preheat your oven to 325°F. Heat 2 tablespoons olive oil in a large Dutch oven over medium-high heat until shimmering. Pat the 3 lb beef rib tips dry with paper towels—this ensures a good sear instead of steaming. Working in batches if needed, add the rib tips to the pot in a single layer and sear for 3-4 minutes per side until deeply browned. You're looking for that golden crust that locks in juices.
Don't crowd the pan or you'll steam instead of sear. If the oil smokes excessively, reduce heat slightly. Once all pieces are browned, remove them and set aside on a plate. This initial searing builds the foundation for all that rich flavor we're after.
Build the Dry Rub and Brown the Aromatics
In a small bowl, combine 2 tablespoons onion powder, 1.5 tablespoons smoked paprika, 1.5 tablespoons ground black pepper, 1 tablespoon brown sugar, 1.5 tablespoons salt, 8 minced garlic cloves, 0.25 cup chopped fresh rosemary, and 0.25 cup chopped fresh thyme. This aromatic blend is what transforms tough meat into something extraordinary.
Return the seared rib tips to the Dutch oven and sprinkle half of the dry rub mixture evenly over them. Toss gently to coat. Then, increase heat to medium-high and add 1 tablespoon balsamic vinegar and 1 tablespoon Worcestershire sauce to the pot. Let this bubble for 2-3 minutes until the vinegar reduces slightly and the aromatics start to sizzle. This step develops the sauce's depth before we add the braising liquid.
Braise Until Fork-Tender
Pour 1.5 cups beef broth into the Dutch oven, scraping up any browned bits from the bottom with a wooden spoon. These bits are packed with flavor—don't miss them. Return the rib tips to the pot, spooning the liquid over them, and bring everything to a simmer over medium heat. Once simmering, transfer the pot to your preheated 325°F oven. Cover tightly with the lid.
Braise for 3 hours, checking occasionally. You'll notice the meat releases easily from the bone and the liquid reduces significantly. After 3 hours, remove the lid and increase oven temperature to 375°F. Baste the rib tips with the reduced sauce, then return to the oven uncovered for another 30-45 minutes until the sauce thickens and the meat is fork-tender with no resistance.
Rest and Serve with Pan Sauce
Let the rib tips rest in the Dutch oven for 15-20 minutes before serving. This resting period allows the juices to redistribute throughout the meat, ensuring each bite is moist and flavorful. While they rest, skim any excess fat from the surface of the sauce if desired, then adjust seasoning with additional salt if needed.
Serve the rib tips directly from the Dutch oven, spooning that rich, caramelized sauce over each portion. The meat should pull apart easily with two forks, revealing tender beef that clings to the bone. Pair with crusty bread to soak up every last drop of that delicious sauce—you'll want to lick the plate clean.
Pro Tips For Making Baked Rib Tips
- Sear Before Baking: I learned this the hard way—skipping the sear means bland, gray rib tips. Pat them dry first, then hit them with high heat in a hot pan for 2-3 minutes per side until they’re deeply browned. That crust locks in flavor and makes all the difference when they bake.
- Crush That Garlic: Minced garlic burns fast, and you don’t want it tasting bitter. For this recipe, smash the cloves with the flat side of your knife first, then finely chop—no need to go tiny, just even. It’ll release flavor without turning to paste.
- Skip the Overcrowding: Rib tips need space to brown, not steam. If your pan or sheet is packed, they’ll turn soggy. Arrange them in a single layer with gaps, and if you’re short on space, work in batches. Trust me, the crispy edges are worth the wait.
- Use a Meat Thermometer: Guessing with rib tips leads to dryness. Pull them at 195°F internal temp—they’ll carry over to 203°F, which is perfect for tender, juicy meat. No thermometer? Cut into one—if it’s fork-tender with just a hint of pink, you’re golden.
Pro cooking tips for perfect results
Dry Rub Mastery
The secret to tender, flavorful rib tips lies in the dry rub—don’t skip toasting the spices! Heat your onion powder, smoked paprika, and black pepper in a dry pan for 30 seconds until fragrant.
This releases their essential oils, amplifying their flavor. I like to add 1 tbsp brown sugar here too—it caramelizes during baking, adding depth. Use freshly ground black pepper if possible; pre-ground loses potency quickly. 🌶️
Two-Stage Baking
Low-and-slow is key, but the real magic happens in the final 30-45 minutes at 375°F. After 3 hours of braising at 325°F, uncover the pot and crank up the heat.
This caramelizes the sauce and creates a glossy finish. Baste the ribs with the reduced juices every 10 minutes—this ensures even browning and maximum flavor infusion.
Fat Skimming
After baking, skim excess fat from the sauce while the ribs rest. Use a large spoon or fat separator—I prefer a fat skimmer spoon for precision. This step keeps the sauce lighter without sacrificing richness.
If the sauce is too thick after resting, whisk in 1-2 tbsp beef broth to loosen it. The goal is a velvety, clingy sauce that coats every bite. ✨
Resting Rules
Never skip the 15-20 minute rest—this is non-negotiable for juicy ribs. The meat continues cooking off the heat, redistributing juices. I cover the pot loosely with foil to retain heat.
If you cut into the ribs too soon, all that delicious juice will run out, leaving you with dry meat. Trust the process!
Dutch Oven Essentials
Your choice of Dutch oven matters! I swear by Lodge 5.5-quart for even heat distribution and durability. If yours isn’t heavy enough, place it on a baking sheet to catch drips.
Avoid nonstick pots—they can’t handle the high heat needed for proper browning. A well-seasoned cast iron Dutch oven is worth the investment for dishes like this. 🔥
Leftovers Hack
Rib tips taste even better the next day as the flavors meld. Store in an airtight container with the sauce—it’ll thicken further overnight. To reheat, cover with foil and warm in a 350°F oven for 20-30 minutes until heated through.
Add 1-2 tbsp beef broth if the sauce seems dry. This method preserves texture better than microwaving.
Nutrition facts
Frequently asked questions
Can I use bone-in or boneless rib tips for this recipe?
This recipe is specifically designed for bone-in rib tips—the bones add incredible depth of flavor as they braise. However, if you must use boneless, cut beef chuck roast into 2-inch chunks and increase cooking time by 30-45 minutes to ensure tenderness. The texture won't be identical, but it'll still be delicious!
What if my oven doesn't go up to 375°F for the final stage?
No problem! After the initial 3-hour braise at 325°F, simply increase to the highest temperature your oven can handle (even 350°F works). Just add 10-15 extra minutes uncovered, basting with sauce every 5 minutes to compensate for the lower heat. The goal is caramelization, not speed!
How do I know when the rib tips are fully cooked?
The ribs are done when they're fork-tender with no resistance and the internal temperature reaches 195-203°F (use a meat thermometer). You'll also see the sauce thicken and darken slightly during the final 30-45 minutes at 375°F. If they're still slightly firm, return to the oven for another 10-15 minutes.
Can I make this recipe in a slow cooker instead?
Sear the rib tips first, then transfer everything to a slow cooker and cook on Low for 6-8 hours or High for 4-5 hours. For the final caramelization, transfer to a baking dish and broil for 5-7 minutes at the end. The texture will be slightly different but still incredibly tender and flavorful.
What's the best way to reheat leftovers?
Reheat leftovers in a 350°F oven for 20-30 minutes covered with foil, adding 1-2 tbsp beef broth if the sauce seems dry. Avoid microwaving—it makes the meat tough. For extra flavor, add a splash of balsamic vinegar or Worcestershire sauce during reheating to refresh the taste.