Side Dishes
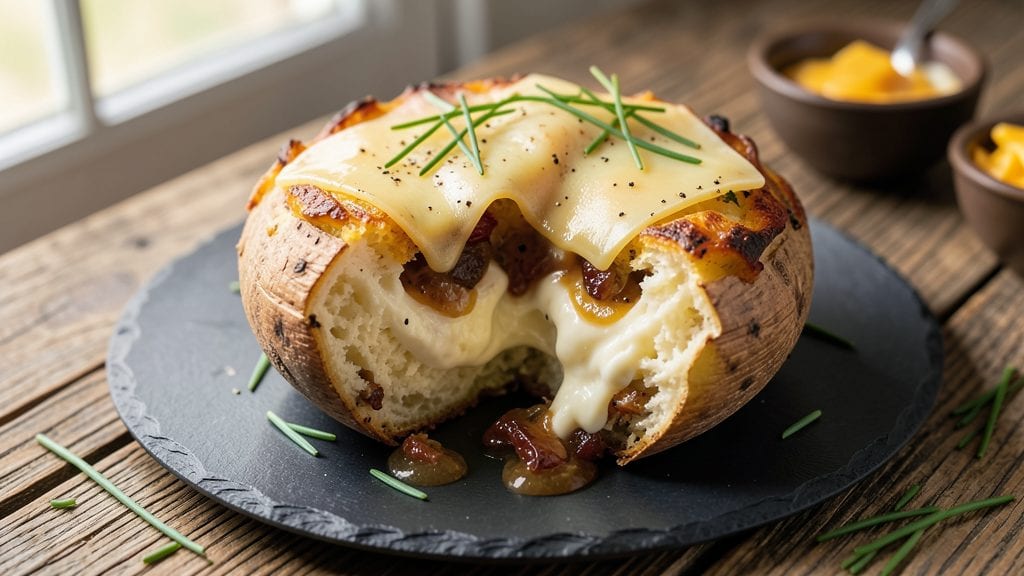
Emeril Lagasse's twice-baked potato recipe delivers the perfect balance of crispy golden tops and creamy, velvety centers—just like your favorite restaurant. This method transforms simple potatoes into a showstopping side dish with a buttery, herb-infused filling that's impossible to resist.
The secret lies in precise baking and reheating techniques that ensure every bite meets Emeril's signature standards.
What sets this recipe apart is the foolproof approach to achieving that restaurant-quality texture. Start with russet potatoes baked until tender, then split, fluff, and mix with a rich blend of butter, cream, cheese, and herbs.
The second baking creates that coveted crispy crust while keeping the filling warm and luscious. With just 15 minutes of active prep time and 1 hour of baking, you'll have a dish that's worth the wait.
The result is a twice-baked potato with a crispy exterior that shatters slightly with each bite, giving way to a creamy interior loaded with flavor. The aroma of garlic, chives, and melted cheese fills your kitchen, making it impossible to resist digging in.
This recipe is perfect for game day, holiday dinners, or any occasion where you want to elevate your side dish.
Whether you're serving a crowd or treating yourself to a special meal, this method delivers consistent, professional results every time. The key is patience—letting the potatoes bake thoroughly before mixing and reheating ensures that crispy top and creamy center you crave.
Let's get started on creating your best twice-baked potatoes yet.
Ingredients for emeril twice baked potato
Four russets, butter, cream, and cheese—this is Emeril's magic combo for showstopping twice-baked potatoes.
| Ingredient | Amount | Notes |
|---|---|---|
| Russet Potatoes 🥔 | 4 large | Unpeeled, scrubbed well |
| Unsalted Butter 🧈 | ½ cup | Cold, cubed for topping |
| Heavy Cream 🥛 | ½ cup | Full-fat for richness |
| Sharp Cheddar Cheese 🧀 | 1 cup | Shredded, aged 6+ months |
| Garlic Cloves 🧄 | 4 cloves | Minced, fresh preferred |
| Fresh Chives 🌿 | ¼ cup | Finely chopped, stems removed |
| Diamond Crystal Kosher Salt 🧂 | 1 tsp | For seasoning, not iodized |
| Freshly Ground Black Pepper 🌶️ | ½ tsp | Cracked peppercorns preferred |
| Sour Cream 🥛 | ¼ cup | Full-fat, room temperature |
| Parmesan Cheese 🧀 | ¼ cup | Freshly grated, block form |
| Milk 🥛 | ¼ cup | Whole milk preferred |
The russets are non-negotiable—Idaho-grown if you can find them, but any russet works. Look for firm, blemish-free potatoes at Whole Foods or Trader Joe's for the best texture. The secret? Cold start—bake them straight from the fridge for even cooking. For extra crispiness, I always brush the tops with melted butter before the final bake. The cheddar should be aged at least 6 months—you can taste the difference when it melts. Bob's Red Mill shredded is a great shortcut if grating feels tedious, but freshly grated always wins for flavor.
No heavy cream? Half-and-half plus a splash of milk works in a pinch, though the texture won't be quite as luscious. Swapping cheddar for Gruyère or Monterey Jack changes the game—Gruyère adds nutty depth, while Monterey Jack keeps it mild. Fresh chives are ideal, but dried chives at half the amount save you a trip to the store. The garlic can be roasted for a sweeter flavor—just toss whole cloves with olive oil and bake at 400°F for 15 minutes before mincing. For extra richness, add 1 tablespoon sour cream to the filling mix—trust me, it makes all the difference.
This dish is all about timing—bake the potatoes first, then assemble. Store the filling separately in the fridge for up to 2 days before topping. For leftovers, reheat covered at 375°F until the top is golden and bubbly—about 20-25 minutes. The filling keeps for 3 days in the fridge, so double the batch for game day. Freeze the filling (without topping) for up to 3 monthsParmesan on top before the final bake for extra cheesy crunch.
Why You'll Love This Recipe
- One-Pan Magic: I swear by this recipe because it’s that easy—just bake, scoop, mix, bake again. No chopping, no fuss, and honestly? The only mess is the good kind (cheese on your fingers).
- Cheddar-Garlic Bliss: That sharp cheddar and roasted garlic? It’s like a hug in potato form. The creamy butter and heavy cream tie it all together—rich, tangy, and so satisfying I’ll take seconds over salad any day.
- Game for Any Gathering: Between us, this feeds a crowd without breaking the bank. Double the batch for game day, potlucks, or even a lazy Sunday—it’s the star that doesn’t steal the show (but you’ll wish it did).
Step-by-step instructions for Emeril Lagasse's twice-baked potatoes
Master this legendary technique for golden, crispy tops and velvety centers that'll impress anyone.
Bake the Potatoes Until Fork-Tender
Preheat your oven to 425°F and prick each of the 4 large russet potatoes all over with a fork—about 8-10 times per potato. This creates steam vents that prevent explosive skins. Place them directly on the middle oven rack and bake for 45-50 minutes until completely tender.
Here's the pro move: Test doneness by piercing with a sharp knife—it should slide in like butter with no resistance. If it's not tender enough, bake another 10 minutes. Real talk: Undercooked potatoes will make your filling soggy, and nobody wants that. Let them cool slightly before handling—hot potatoes are dangerous and make slicing difficult.
Create the Creamy Filling Mixture
While the potatoes cool, combine the 0.5 cup heavy cream, 0.25 cup milk, 0.25 cup sour cream, 1 cup sharp cheddar cheese, 0.25 cup parmesan cheese, 4 cloves minced garlic, 1 tsp diamond crystal kosher salt, and 0.5 tsp freshly ground black pepper in a bowl. Mix until completely smooth—no lumps allowed.
I like to warm the dairy ingredients slightly first (just until steaming) to help the cheeses melt more evenly. This ensures your filling stays creamy and doesn't separate. Taste and adjust seasoning—you might need a pinch more salt or pepper depending on your cheddar's sharpness. The filling should be rich but not overpowering.
Slice and Prepare the Potatoes for Topping
Carefully slice each cooled potato horizontally about ½-inch from the top, creating lids. Scoop out the flesh into a bowl, leaving a ¼-inch thick shell. This thin layer is crucial for that perfect crispy texture. Mash the potato flesh with a potato masher until smooth, then stir in the prepared filling mixture until fully combined.
Don't skip the shell thickness check—if it's too thin, the potatoes will collapse. If you accidentally make it too thick, simply slice off the excess. The key is maintaining that delicate balance between structure and crispiness. Here's where Emeril's magic happens: the thin shell creates the perfect canvas for that crispy, buttery top.
Assemble and Bake to Golden Perfection
Preheat your oven to 375°F. Spoon the filling mixture back into the potato shells, pressing down gently to fill completely. Place the potato tops back on and spread an even layer of 0.5 cup cold unsalted butter over each top. Sprinkle with 0.25 cup finely chopped fresh chives for that signature Emeril touch.
Bake for 20-25 minutes until the tops are deep golden brown and the filling is bubbling at the edges. The butter should be melted and crispy—this is your visual cue for perfection. If you see the tops browning too quickly, tent loosely with foil to prevent burning while still allowing the bottoms to crisp.
Rest and Serve with Confidence
Remove from the oven and let rest for 5 minutes before serving. This resting period allows the filling to set slightly, making it easier to slice through cleanly. Cut each potato in half to reveal that stunning contrast—crispy, golden-brown tops and creamy, cheesy centers.
The secret to serving these like a pro? Use a sharp chef's knife and cut straight down through the center. The filling should be smooth and rich, with no separation, and those chive garnishes should add a fresh pop of color. Serve immediately while the tops are still crispy—these potatoes don't reheat well. Pair with a simple green salad and you've got an impressive, restaurant-quality meal in one dish.
Pro Tips For Making Emeril Twice Baked Potato
- PIERCE POTATOES FIRST: Stick a fork in those Russets before baking—it’s the only way to guarantee even cooking. I learned this the hard way when I skipped it and ended up with a raw center that turned to glue when I tried to mash it later. Aim for a fork that slides in like butter, not like you’re fighting through wet sand.
- USE FULLY COOKED GARLIC: Roast those garlic cloves at 400°F for 15 minutes before mincing them into the cream-cheese mix. Raw garlic burns easily and leaves a bitter aftertaste, but roasted garlic adds sweetness and depth that makes the whole dish sing. (Yes, even if you’re impatient like me.)
- DON’T OVERMIX THE FILLING: Once you mix the cream, cheese, and butter, stir just until combined—lumpy is better than mushy. Overworking it turns the filling into a sad, dense paste instead of a creamy, melt-in-your-mouth cloud. Think "rustic," not "institutional."
- BAKE UNTIL GOLDEN, NOT JUST SOFT: Broil the topped potatoes for the last 2-3 minutes until the cheese turns golden and crispy, not just bubbly. I used to walk away too soon, and the cheese would stay pale and gloppy. Keep an eye on them—this is the part that makes the dish look (and taste) restaurant-worthy.
Dietary considerations for these flavors
Gluten-Free Adaptation
This recipe is naturally gluten-free, but watch for potential cross-contamination if using pre-shredded cheeses or store-bought spices. I always opt for Bob's Red Mill shredded cheddar, which is certified gluten-free, and check labels on chives or other garnishes.
The key is ensuring all ingredients—especially cheese and butter—are processed in dedicated gluten-free facilities. 🌱
Dairy-Free Version
For a dairy-free twist, replace the butter with Earth Balance vegan butter and swap heavy cream for full-fat coconut milk. Use nutritional yeast instead of parmesan for that cheesy depth, and opt for dairy-free cheddar like Violife.
The texture will be slightly different but still delicious. I recommend adding 1 tbsp olive oil to the filling for richness.
Lower-Carb Option
Cut carbs by using half the potatoes (2 instead of 4) and adding 1 cup cauliflower rice to the filling mixture. The cauliflower helps bulk up the filling while keeping it creamy.
I also reduce the sour cream to 2 tbsp and add ¼ cup Greek yogurt for extra protein. This version still delivers that crispy top while being more keto-friendly.
Vegetarian Protein Boost
Add ½ cup cooked quinoa or black beans to the filling for extra protein and texture. I like to season the beans with ½ tsp smoked paprika and ¼ tsp cumin before mixing them in.
For a creamier texture, blend the beans with the dairy ingredients before adding the cheese. This keeps the dish vegetarian while making it more substantial. 💪
Allergen-Friendly Swaps
For nut allergies, avoid any nut-based cheeses and stick with dairy-free alternatives. If garlic is an issue, substitute with asafetida powder (just a pinch) for a similar savory depth.
For chive allergies, use green onion tops** or omit entirely. Always double-check labels on pre-packaged ingredients like cheese or butter to ensure they're processed in allergen-free facilities.
Nutrition facts
Frequently asked questions
Can I make these potatoes ahead of time?
Prepare the filling mixture and store it separately in an airtight container for up to 2 days in the fridge. When ready to serve, spoon the filling into the potato shells and bake as directed. For the best texture, assemble and bake within 24 hours—the filling stays creamy but won't be as crispy if stored longer.
Why did my potato tops get soggy instead of crispy?
Soggy tops usually happen when the potatoes aren't baked long enough the first time or if the oven isn't hot enough during the second bake. Always test for doneness with a fork in the first bake—it should slide in easily. For the final bake, ensure your oven reaches 375°F and use cold butter on top to create a crispy barrier. A 5-minute rest after baking also helps set the texture.
What's the best way to reheat leftovers?
Twice-baked potatoes don't reheat as well as they do fresh, but you can revive them by covering with foil and baking at 350°F for 15-20 minutes until warmed through. For best results, focus on making extra filling and storing it separately—then assemble and bake fresh when serving. The crispy tops won't be as perfect, but the creamy filling stays delicious.
Can I use sweet potatoes instead of russets?
While possible, russet potatoes are ideal because their high starch content creates that perfect fluffy interior and crispy exterior. Sweet potatoes have more moisture and a denser texture, which can make the filling soggy. If you must use them, roast them first at 400°F for 45 minutes to dry them out, then proceed with the recipe—but expect a slightly different texture.
How do I make these extra cheesy?
For a cheesier version, add ½ cup extra sharp cheddar to the filling or sprinkle ¼ cup grated parmesan on top before the final bake. You can also mix in 2 oz cream cheese with the dairy ingredients for extra richness. Just be prepared for a more indulgent (but equally delicious) result!