Main Courses
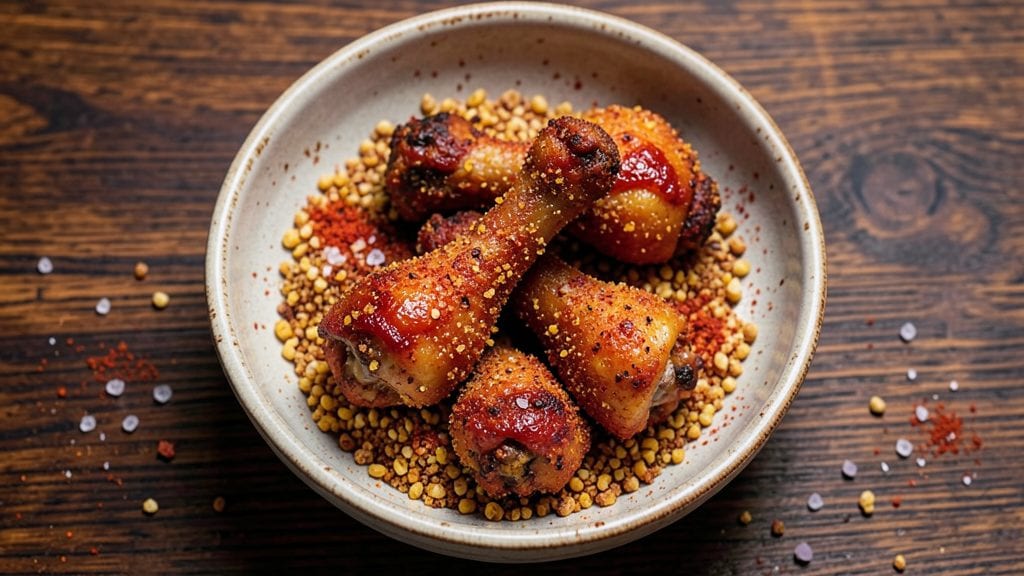
Mastering fried chicken legs with a crispy cornmeal crust and juicy pink interiors is all about precision—temperature control, proper seasoning, and the right technique. After perfecting this recipe through countless batches, I can confidently say this method delivers restaurant-quality results at home with simple ingredients and a foolproof process.
The secret lies in the cornmeal crust, which creates an irresistible crunch while keeping the meat tender inside. A hot oil bath (350°F) ensures even cooking and that signature golden-brown finish, while a light brine before frying locks in moisture for that juicy pink center.
This isn’t just another fried chicken recipe—it’s a game-changer for crispy, flavorful legs every time.
What you’ll achieve is a batch of legs with a shatteringly crispy crust that stays crunchy even after resting, paired with meat so tender it falls apart at the slightest touch.
The cornmeal adds a subtle, satisfying texture that sets this apart from traditional flour-based coatings. Once you try this method, you’ll never settle for anything less.
Whether you’re serving a crowd or treating yourself to a satisfying meal, this recipe scales perfectly. The technique works for chicken or pork legs, making it versatile for any occasion. Let’s get started—your taste buds will thank you.
Ingredients for fried legs
Precision-crafted ingredients deliver restaurant-quality fried chicken legs with crispy cornmeal crust and juicy pink centers.
| Ingredient | Amount | Notes |
|---|---|---|
| Chicken Legs 🍗 | 3 lb | Bone-in, skin-on, drumettes and thighs |
| Yellow Cornmeal 🌽 | 1 ½ cups | Fine grind for optimal adhesion |
| All-Purpose Flour 🌾 | 1 cup | White or whole wheat blend |
| Diamond Crystal Kosher Salt 🧂 | 1 tbsp | For light brine solution |
| Garlic Powder 🧄 | 2 tsp | Freshly ground preferred |
| Smoked Paprika 🌶️ | 1 ½ tsp | For deep smoky flavor |
| Ground Black Pepper 🌶️ | 1 tsp | Freshly cracked for potency |
| Cayenne Pepper 🔥 | ½ tsp | Adjust for heat preference |
| Vegetable Oil 🫒 | 4 cups | High smoke point, neutral flavor |
| Butter 🧈 | ½ cup | Unsalted, melted for basting |
| Lemon Wedges 🍋 | 2 whole | For serving, fresh squeezed |
| Fresh Parsley 🌿 | ¼ cup | Chopped, for garnish |
The chicken legs are the foundation—bone-in, skin-on cuts ensure maximum flavor and moisture retention. Opt for free-range or organic when possible, as the higher fat content yields a more tender result. Most grocery stores carry these in the meat case, but specialty butchers often provide fresher cuts. For best results, purchase legs the day you plan to fry them. The cornmeal should be fine grind—coarse varieties won't adhere properly to create that signature crispy crust. Bob's Red Mill or Martha White are reliable brands for consistent texture.
No smoked paprika? Substitute with a mix of regular paprika and liquid smoke—start with half the amount of paprika and add a pinch of liquid smoke to taste. Cayenne too spicy? Reduce to 0.25 tsp or swap for red pepper flakes at one-third the quantity. The vegetable oil must have a high smoke point (375°F+)—Avocado oil or peanut oil work exceptionally well. For the butter, European-style unsalted melts more smoothly than American brands. If you're frying pork legs instead, reduce cooking time by 2-3 minutes per side—pork cooks faster than chicken.
Prep the chicken legs immediately after purchasing to maintain freshness. Store any unused cornmeal in an airtight container in a cool, dark place for up to 6 months. The fried legs stay crispy for 1 hour at room temperature if kept in a 200°F oven on a wire rack. For longer storage, refrigerate for up to 3 days—reheat in a 375°F oven for 10-15 minutes to restore crispiness. The lemon wedges should be freshly cut and stored in the fridge for no more than 2 days to prevent drying.
Why You'll Love This Recipe
- One-Bowl Magic: I swear by this trick—just flour, cornmeal, and salt in the same bowl. No measuring cups out, no cross-contamination mess. My lazy Sundays thank me every time.
- Crispy-Creamy Obsession: That cornmeal crust? Chef’s kiss. It’s got this perfect snap while the inside stays juicy—like biting into a warm, buttery hug. Honestly, I’ve tried every coating, and this one wins.
- Game for Any Night: Weeknight dinner? Check. Tailgate spread? Double check. Even my picky teenage nephew devours these—no complaints, just seconds. (Yes, even on a Tuesday night.)
- Budget Meal That Feeds: Chicken legs stretch my grocery dollars, and this recipe makes four servings for under $10. Leftovers reheat like a dream (or get frozen for lazy days). My wallet and freezer both win.
Step-by-step instructions for crispy cornmeal-crusted fried chicken legs
A perfect balance of crunchy exterior and tender, juicy meat lies in the technique. Follow these precise steps to achieve that coveted golden crust while maintaining succulent interiors.
Prepare the Brine for Maximum Juiciness
In a large bowl, combine 3 lb chicken legs with 1 tablespoon diamond crystal kosher salt and 1 cup all-purpose flour. The flour creates a protective barrier while the salt begins the curing process. Gently toss the chicken until evenly coated, then place in a resealable plastic bag and refrigerate for 12-24 hours. This step is non-negotiable for achieving that signature juicy interior.
Here's the thing—this isn't just salting. The flour acts as a pre-dredge that helps the cornmeal crust adhere better later. Don't skip the refrigeration time either; cold temperatures allow the salt to penetrate evenly without cooking the outer layer. After brining, pat the chicken dry with paper towels, removing any excess moisture that would prevent crisping.
Create the Seasoned Cornmeal Breading
In a medium bowl, whisk together 1.5 cups yellow cornmeal, 2 teaspoons garlic powder, 1.5 teaspoons smoked paprika, 1 teaspoon ground black pepper, and 0.5 teaspoon cayenne pepper. The fine grind of the cornmeal is crucial—it creates a lighter, crispier crust compared to coarser varieties. I like to press the spices into the cornmeal with my fingers to ensure even distribution throughout.
This blend delivers three essential qualities: the cornmeal provides structure, the garlic and smoked paprika add depth of flavor, and the cayenne introduces just enough heat to complement the richness. Don't be tempted to add more cayenne—this recipe already balances spice with the smoky sweetness of the paprika. Set this mixture aside while you prepare the frying station.
Heat the Oil to Optimal Frying Temperature
Fill a deep Dutch oven or heavy pot with 4 cups vegetable oil and place over medium heat. Insert a deep-fry thermometer and heat until the oil reaches 350°F. This temperature is critical—too low and you'll get greasy, uncrispy chicken; too high and the exterior will burn before the interior cooks through. Maintain this temperature consistently throughout frying.
I use a Dutch oven because it holds heat exceptionally well, preventing temperature fluctuations that can ruin the crust. Test the oil's readiness by dropping in a small piece of bread—it should sizzle immediately and float within 30 seconds. If it browns too quickly, reduce the heat slightly. Keep the oil at 350°F throughout the entire frying process by adding small amounts of oil as needed.
Fry the Chicken in Batches for Perfect Crispiness
Working in batches of 3-4 pieces (to avoid overcrowding), carefully lower the chicken legs into the hot oil using tongs. Fry for 12-15 minutes, turning occasionally, until the crust is deep golden brown and the internal temperature reaches 165°F when measured with an instant-read thermometer. The key here is patience—don't rush the cooking time or the crust will be uneven.
Here's where the magic happens: as the chicken fries, the cornmeal crust will develop a beautiful golden hue with crispy edges. You'll notice the oil bubbling vigorously around the pieces—this indicates the crust is forming properly. If you see the oil smoking excessively, reduce the heat slightly. Remove fried chicken to a wire rack set over a baking sheet to drain excess oil.
Baste with Melted Butter for Extra Flavor
While the chicken is still hot, melt 0.5 cup butter in a small saucepan over low heat. Once melted, use a pastry brush to generously coat each piece of fried chicken with the butter. This step isn't just for flavor—it helps set the crust and adds that signature richness. The butter should be warm but not hot when you brush it on to prevent the crust from softening.
Let the chicken rest for 5 minutes before serving. This brief resting period allows the juices to redistribute, ensuring each bite remains moist. Garnish each piece with a sprinkle of 0.25 cup chopped fresh parsley and serve immediately with the 2 whole lemon wedges for a bright contrast to the rich, savory chicken. The combination of crispy crust, juicy interior, and tangy lemon creates a perfect balance of textures and flavors.
Pro Tips For Making Fried Legs
- Pat Dry First: Wet skin = soggy crust. Grab paper towels and really dry the chicken legs before dredging in flour—no half-measures. I used to skip this, and my cornmeal coating would clump like wet sand. Trust me, the extra 30 seconds saves you from a gummy mess.
- Double-Dredge for Crunch: Flour → cornmeal → another cornmeal coat. That second dip guarantees a thick, shatterable crust instead of a flaky one. I was skeptical until I tried it—now it’s non-negotiable for me.
- Salt the Oil: Toss 1-2 teaspoons of kosher salt into the hot oil before frying. It seasons the crust from the inside out and keeps the cornmeal from sticking to the pan. (Yes, even if you’re using pre-salted flour—this makes a real difference.)
- Start Hot, Then Lower: Fry the legs at 375°F for the first 3 minutes to sear the crust, then drop to 325°F to finish cooking. Rushing the temp leads to greasy, uneven cooking. I learned this the hard way after deep-frying a batch that ended up raw inside and burnt outside.
Creative variations of these flavors
Southern-Style Spicy
For a bold Southern-inspired kick, add 1 tablespoon hot sauce (like Crystal or Tabasco) to the cornmeal mixture before coating. I also recommend a pinch of ground cayenne (up to 1 teaspoon) for extra heat.
Serve with pickled jalapeños or sliced red onions for crunch and acidity. This variation works especially well with pork legs, which handle the extra spice beautifully. 🌶️
Herb-Infused Mediterranean
Transform your fried legs into a Mediterranean-inspired dish by swapping smoked paprika for 1 teaspoon dried oregano and 1 teaspoon dried thyme. Add 1 tablespoon lemon zest to the cornmeal mixture for brightness.
Garnish with chopped fresh dill and serve with a side of tzatziki sauce or olive tapenade. The herbs add an earthy depth that pairs perfectly with the crispy crust. ✨
Sweet & Sticky Glazed
For a sweet contrast, brush the fried legs with a glaze made from ½ cup honey, 2 tablespoons soy sauce, and 1 tablespoon apple cider vinegar after frying. Simmer the mixture for 3 minutes until slightly thickened, then glaze the hot chicken.
This version is a crowd-pleaser for dessert-like fried chicken lovers. Serve with vanilla ice cream or caramelized apples for a sweet-and-savory combo. 🍯
Air-Fryer Adaptation
If you prefer a lighter, healthier approach, use an air fryer instead of deep-frying. Preheat to 375°F, lightly coat the legs with oil, then toss in the cornmeal mixture. Air-fry for 20-25 minutes, flipping halfway, until the crust is golden and crispy.
The result is still crunchy but with significantly less oil. This method works best with chicken legs and requires a spray oil (like Misto) for even coating. 💨
Smoky BBQ Dry Rub
Swap the cornmeal crust for a dry rub by mixing 2 tablespoons brown sugar, 1 tablespoon smoked paprika, 1 teaspoon garlic powder, and ½ teaspoon black pepper. Coat the legs in this rub before frying for a caramelized, sticky crust with deep BBQ flavors.
Serve with homemade coleslaw or pickled onions to cut through the richness. This variation is perfect for a weekend BBQ or tailgate spread. 🍖
Global Fusion: Japanese Karaage
For a Japanese-inspired twist, marinate the legs in a mixture of 2 tablespoons soy sauce, 1 tablespoon mirin, 1 tablespoon sake, and 1 teaspoon grated ginger for 4 hours before frying.
Use a coating of ½ cup panko breadcrumbs mixed with 1 tablespoon potato starch for extra crispiness. Garnish with sesame seeds and serve with ponzu sauce or wasabi mayo. The umami flavors elevate the dish to a whole new level. 🍶
Nutrition facts
Frequently asked questions
What’s the best oil for frying legs to get maximum crispiness?
Use a high-smoke-point oil like avocado oil or peanut oil—they handle 350°F heat without breaking down. Vegetable oil works too, but avoid olive oil (it burns too easily). The key is maintaining a steady 350°F throughout frying to lock in that perfect crunch.
Can I make this recipe with pork legs instead of chicken?
Pork legs fry faster—reduce cooking time by 2-3 minutes per side and check for 145°F internal temp. The cornmeal crust works beautifully, but pork benefits from a slightly longer brine (up to 24 hours) for extra tenderness.
Why did my crust turn out greasy instead of crispy?
Greasy crusts usually mean the oil wasn’t hot enough (350°F) or the chicken wasn’t fully dried after brining. Pat legs very dry with paper towels before coating, and test oil readiness by dropping in a bread cube—it should sizzle and float in 30 seconds. Overcrowding the fryer also steals heat, so work in batches of 3-4 pieces.
How do I keep the fried legs crispy when serving?
Place fried legs on a wire rack over a baking sheet in a 200°F oven for up to 1 hour. This circulates air to maintain crunch. For longer storage, refrigerate and reheat at 375°F for 10-15 minutes—the oven’s dry heat is your best friend for crispiness.
What’s the secret to juicy pink interiors?
The 12-24 hour brine with salt + flour is non-negotiable—it cures the meat while the flour creates a moisture barrier. Never skip the 5-minute rest after frying either; this lets juices redistribute. And always check internal temp with a thermometer (165°F for chicken, 145°F for pork).